
1. OfficePos Web
OfficePos Web is a web application designed to manage small and medium businesses with one or more stores. Optimized for Retail, Food & Beverage and Hospitality, with a major cost savings.
It's simple and intuitive but powerful and scalable. It provide a network with unlimited users and stores connected all time and it can be accessed from anywhere in the world with an Internet connection.
OfficePos is available in multiple languages and is functional for all countries.
When OfficePos account is created, automatically is created one officepos user. With this user account, you can access OfficePos web, POS and App. The OfficePos users are only used for identification inside the system . You will need as many OfficePos users as you want to have access to the Web, POS or App simultaneously, because each user can only be identified in one system at a time (Web, POS or APP).
You can enjoy OfficePos completely free for 3 months. At the end of that period, or if you want to hire more users or extend the support service, you must subscribe. See prices
Once you create an account at OfficePos, you can access the website. From there you will manage all your business data.
You can add new items, customers, suppliers, employees, payments methods, etc.Also you can create new stores and POS as you desire.
By default, OfficePos already have all necessary for you to start working on a POS: a shop, a POS, a customer, generic products
(you can delete or modify it), etc.
· Web point of sale (webPOS): It’s a POS that no needs any installation and you can use from your own website. It is a simple point of sale that has the most basic functions. You can use from any device, no matter operating system. See more.
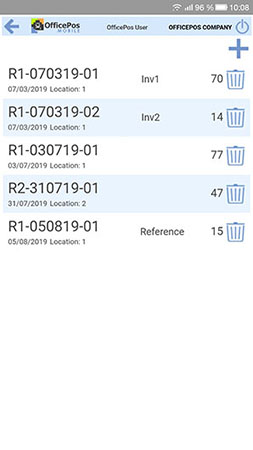
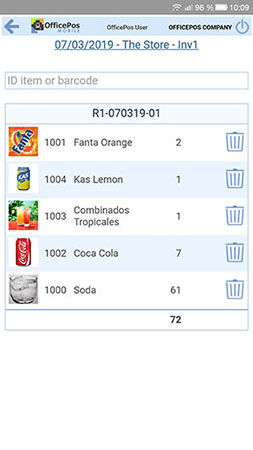
· Mobile point of sale (mPOS): It’s a POS that no needs any installation and you can use from OfficePos Mobile. It is a simple point of sale that has the most basic functions. You can use from any device, no matter operating system.
· Windows point of sale (winPOS): Advanced point of sale, with multiple utilities. It is necessary to install it on a Windows operating system. To download the software click here
We recommend to you do the installation with administrator permissions, and operating systems win7 or win8, disable User Account Control (UAC). You also have to pay attention antivirus you have installed don't block the process..
When you execute OfficePos Point Of Sale for the first time, software asks you what POS you want to be.
It also will ask you if you want to configure POS peripherals in that moment.
When you start the POS, you will see the environment that you created on the website, products, customers, employees etc ... There is a
continuous communication between OfficePos web and OfficePos Point Of Sale, any changes you do on the web, will be reflected in POS.
The sales you make in POS, will be sent to the web (Cloud).
winPOS has the advantage that it is very configurable, can modify everything on the screen. It offers the most advanced features
for a point of sale receipts, invoices, orders, reservations, inventory, label printing, etc .. Also you have the possibility to continue
selling even if no internet connection (Premium users only).
2. Home
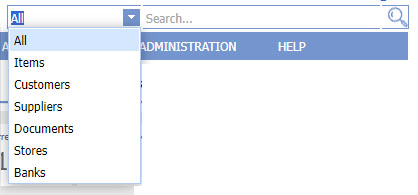
You can use the advanced search option to quickly access data on customers, suppliers, sales, etc. From the upper right part of the screen, filter if you want, by a concept before, then enter the value to search. You can enter name, code, email, supplier, item, bank, etc.
You will see the search results on a screen from where you can access more information options by clicking on the 3 points of the corresponding record.
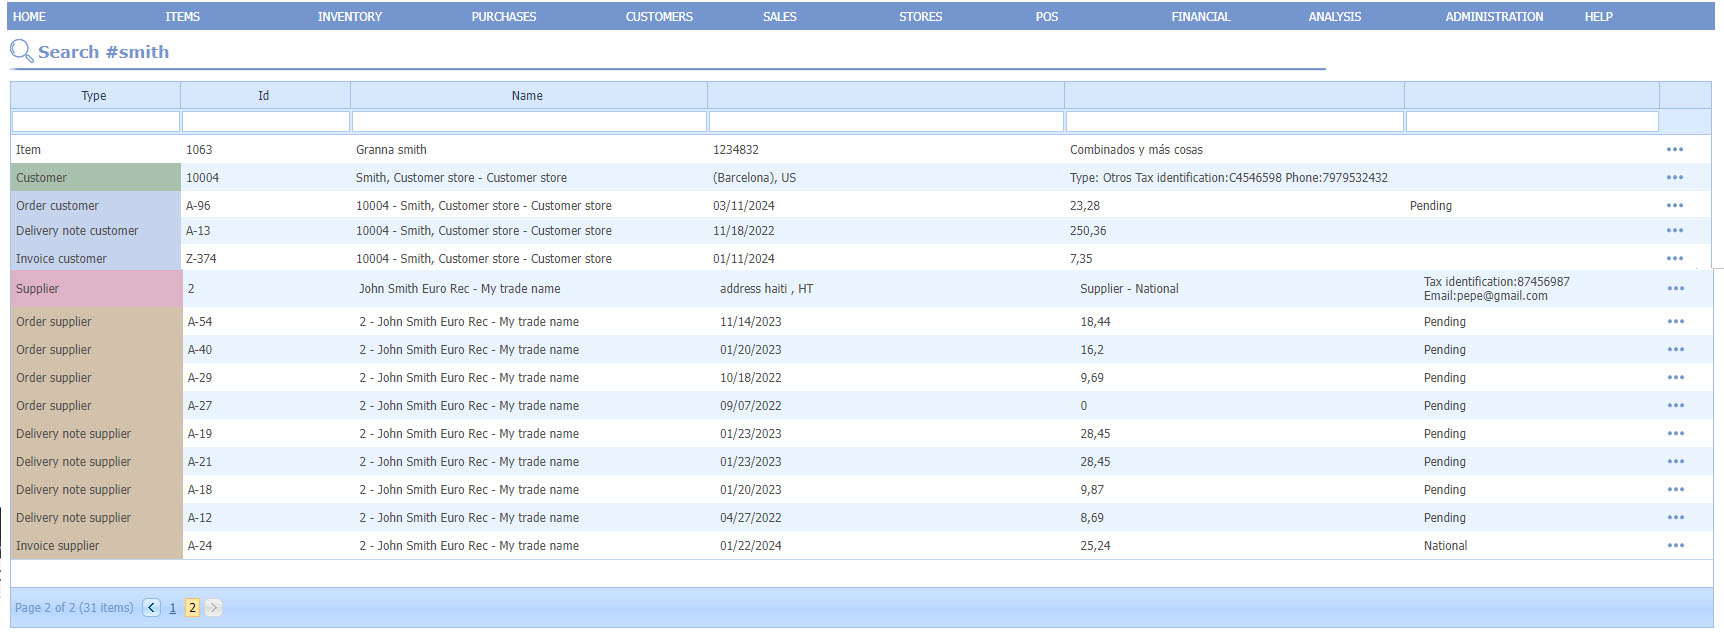
Each type of record has different information options, for example, from customer type records, you can access the customer's file, their movements, accounting, marketing, sales, etc.
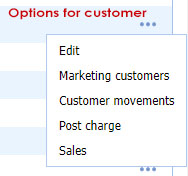
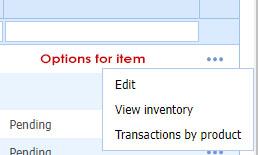

In OfficePos website principal screen, you can see a summary of the activity of your company (Dashboard). You can adjust the time period you want, just select it from "Sales"
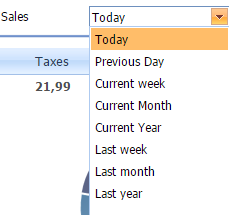
There are many KPI's (Key Performance Indicator) available to the user, sales, purchases, financial, customers, etc. The information you see in the dashboard is configurable from Administration -> Configuration, in the tab DashBoard.
From this screen you will see sales in a period of time. You can see sales with and without taxes, filtered by store or POS, and also filtered by sale concept. If you click on the pdf icon on each line, you will see the receipt or invoice detail. You can export the list to PDF or Excel.

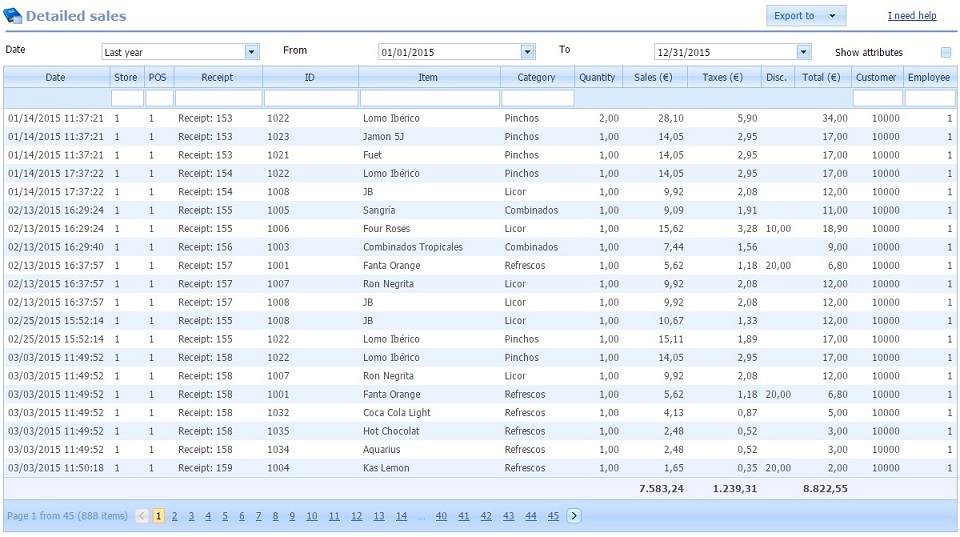
From this screen all sales made by POS will be showed in detail. They are displayed all sold items with the date, store, POS and receipt number. You can export the list to PDF or Excel.
3. Products / Items
List of items/models where you will see the category to which it belongs, the price, if the product is on offer or
not. Premium users can be enabled to see the picture of the product in the list.
There is a search option in the header to search by code, description, barcode, category, etc ...
"See only latest news" shows the latest items created.

If the product has stock treatment, you will see a column with a link "More" by clicking on it, you will see information
about the stock of that product at different stores.
If the product is NOT stock treatment, you will see a column with a link "Sales",
clicking on it, you will see information about the sales of that product in different stores.
Clicking on the link "New", you will add a new product. If you want to edit or delete, click on the corresponding link in the row of the product.
·
Attributes / Models: If your business needs colors and sizes (attributes)
then items list shows in ID column your models. See more
You will see a new column ![]() that lets you create, edit or delete any items that belongs to this model (combinations). For example, you can have a model named "shoe",
and create a lot of items with a color and/or size only clicking on "Attributes" label.
that lets you create, edit or delete any items that belongs to this model (combinations). For example, you can have a model named "shoe",
and create a lot of items with a color and/or size only clicking on "Attributes" label.

Clicking on attributes, you’ll see screen with all colors and sizes available (system has some by default, but you can change it). Then you can create all combinations you wish. Only you have select them.
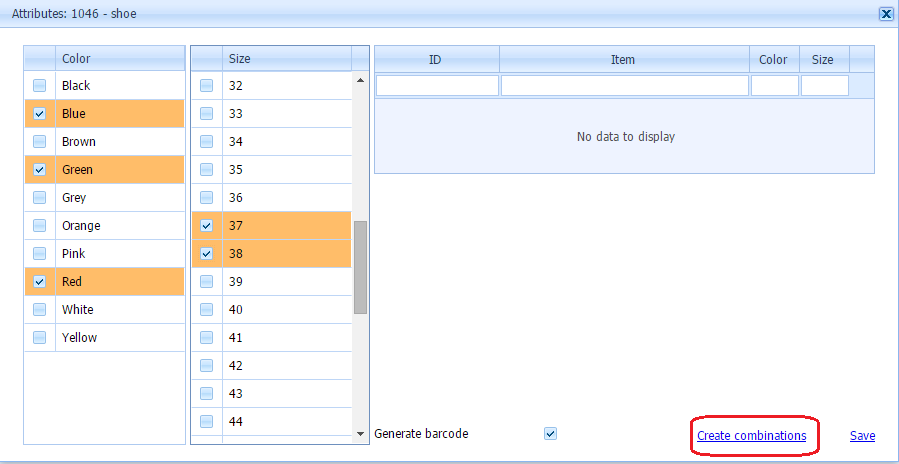
When you select sizes and colors, then you only have to do is click on “Create combinations” and then you’ll see all combinations. You can delete a combination or create new, when you are agree with combinations showed in screen, only click on “Save” and this model items will be created.
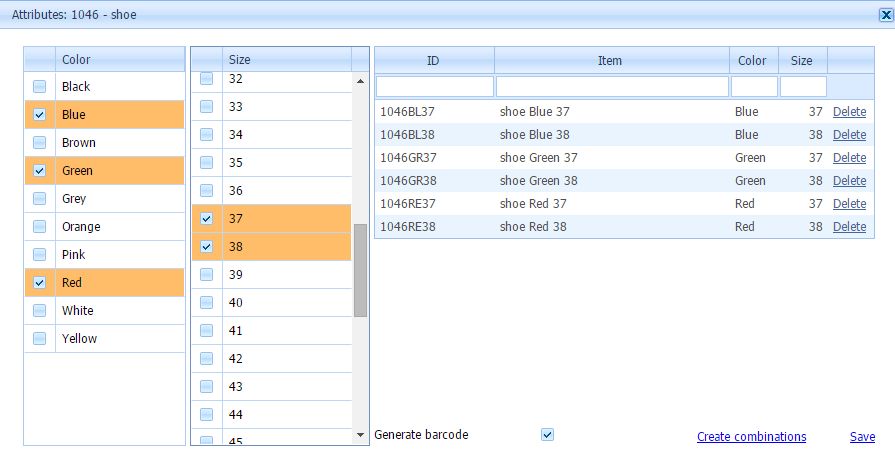
Model's combinations can be modified and consult whenever you want only click on the "attributes" label.

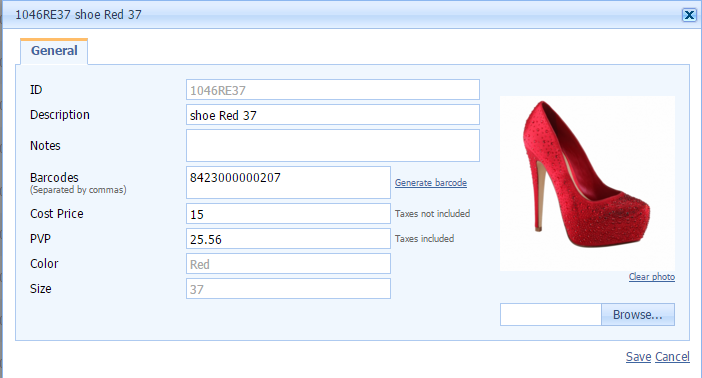
Items initially inherit ALL features of the model to which it belong, although you can customize its data once created (picture, price, barcodes ...)
· Product's file: When you click on NEW or EDIT, OfficePos shows you product's card. In it you will see: the item code (alphanumeric), description, extended description, category, tax (see taxes)), barcodes (you can enter multiple separated by "," or by clicking on the link "Generate barcode" system creates one automatically), cost, sale price, if the products has stock treatment or not, and you can decide if the product is labeling or not. If there is only one store, you can assign an initial stock (in new mode). Also, you can assign a minimum common stock for all stores and image to the product, if you are Premium user.
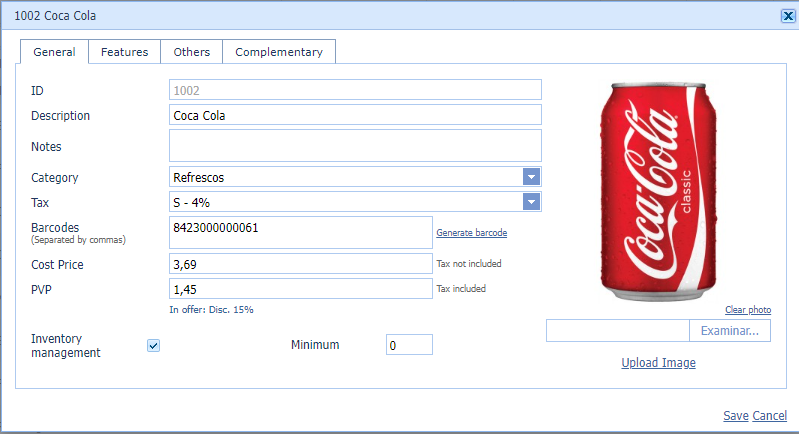
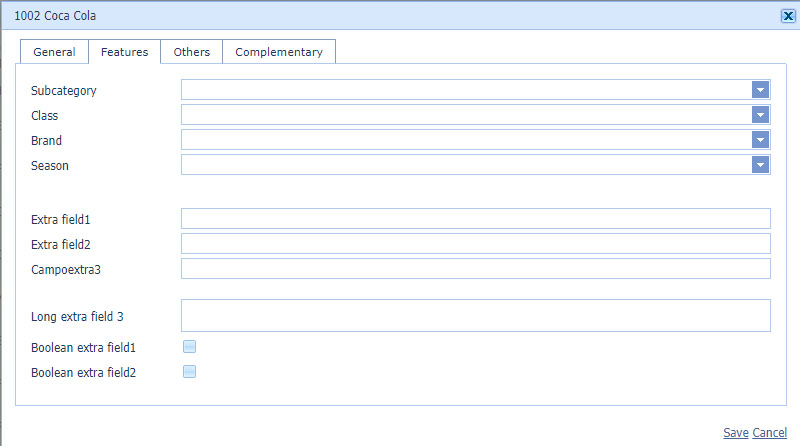
o Features: When you create an item, is necessary select a category. But you have more features that you can actívate. See more categories. There are also free use fields, which you can activate from here..
o Others: You can configure items for use with scales, print labels, set a location, or assign the usual supplier and their purchase code.

o Complementary / Related products: Item can be complemented with other products. For example, if your store is restaurant, you can have a product "steak" and have as related products "rare", "well done", "middle". If your store is retail, you may have a product "pants" and use as related "belt", "braces", etc ... To activate complementary here.

To activate other categories or complementary products go to Setup configuration and Attributes and features.
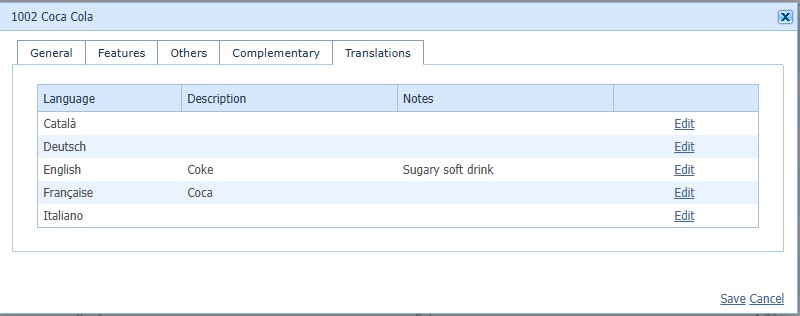
o Translations: Item description and notes translates into the different established languages. If different languages have been configured for the stores, the items will appear in the store language at the points of sale.
From menu option "Items" or from this option, you can search any product, only have to write part of code, description, category, barcode, etc...and OfficePos shows you all matches have been found

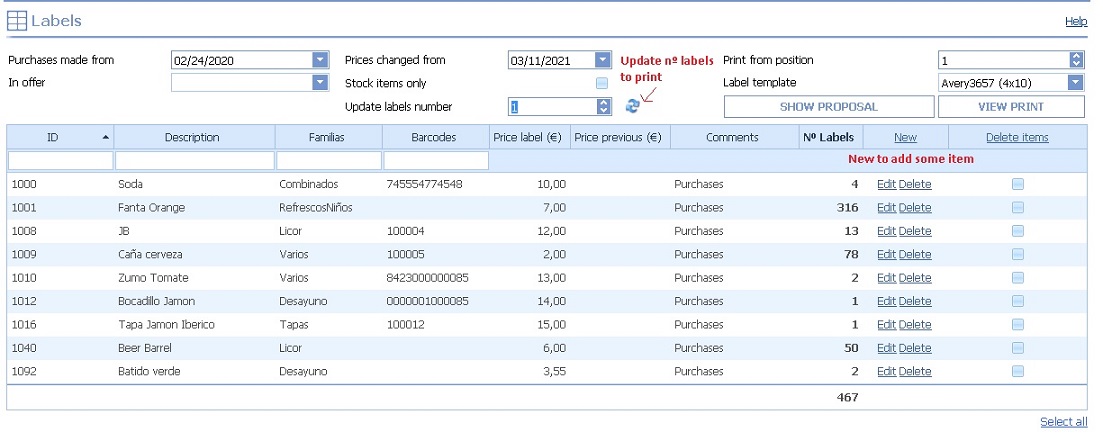
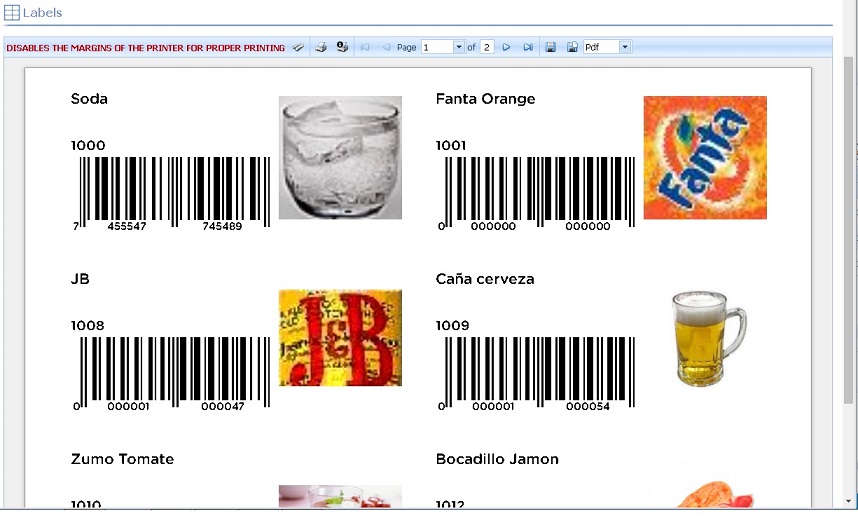
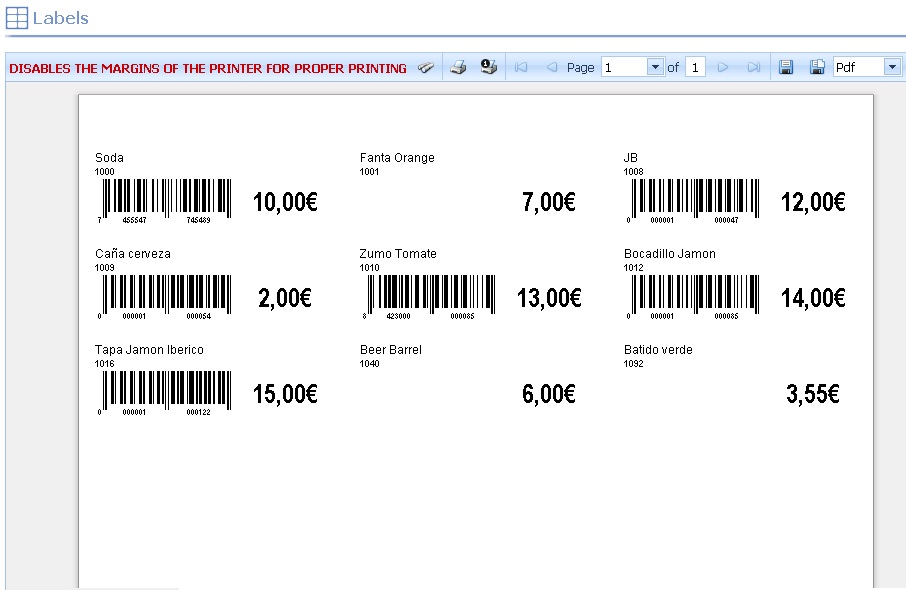
From this option you can print labels, selecting from the different templates that OfficePos offers you. The labels you see on the screen will be printed. The loading of these references will be based on the selection, by the user, of the different filters that we provide.
To load the references with the selected filters, click on the button "Show proposal", to see a preview of the print, click on "View print".
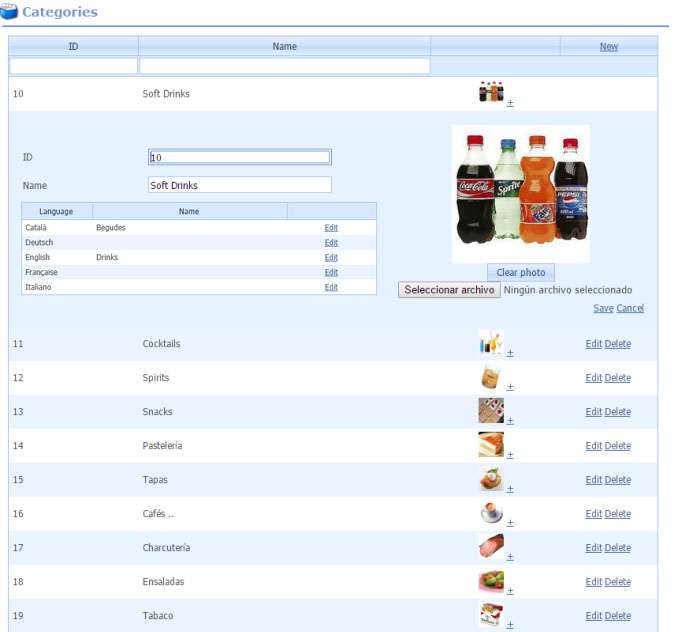
List of categories with id code, description, image and translates if is necessary.
List of subcategories, category code, description and image. To enable this feature you have to access to Setup. Subcategory is a Officepos category by default, but you can decide how to call it or use this category another way.
List of classes, classe code and name. To enable this feature you have to Setup. Classe is a Officepos category by default but you can decide how to call it or use this category another way.
List of brands, brand code and name. To enable this feature you have to Setup. Brand is a Officepos category by default but you can decide how to call it or use this category another way.
List of seasons, code and name. To enable this feature you have to Setup. Season is a Officepos category by default but you can decide how to call it or use this category another way.
List of colors, code and name. To enable this property you have to activate color and size.
List of sizes, name and order. To enable this property you have to activate color and size.
You can configure multiple rates for use in your company. Each rate is formed by products prices. You can assign a standard rate for the company, and also assign a rate for each store.

Clicking "Edit" over a rate row:
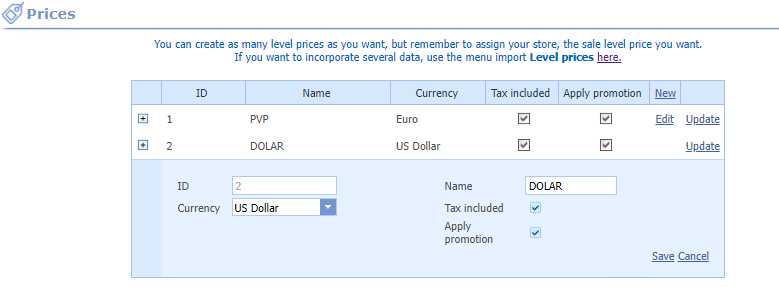
You can add a new rate clicking on "New", enter the code, description/name, currency and if prices will taxes included or not (by default it has). When you add a rate, is created for all products price = 0. To change, click on the line rate (symbol +) and press "Edit" on the line the desired product. You can also update a lot of prices from import option.
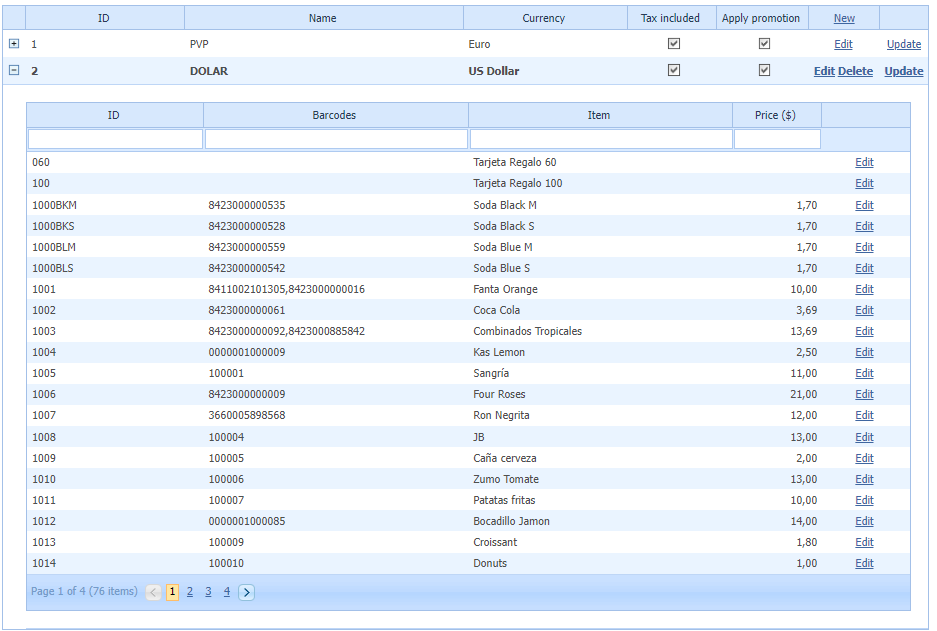
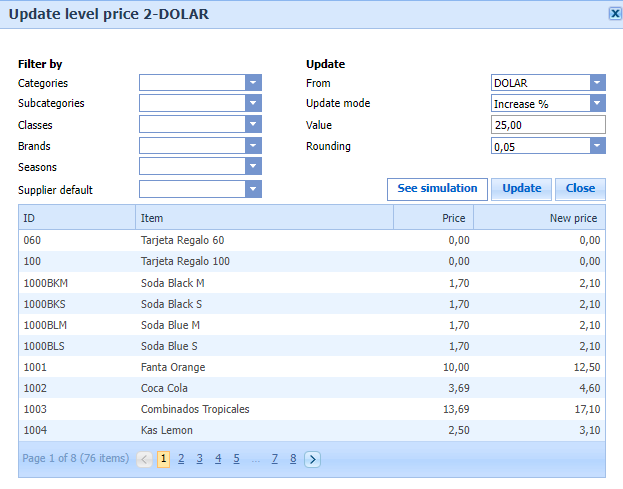
Also you can update massively items prices using an existing rate, click on “Update”. You can select the filters to update the desired items, as well as the type of update you want to perform with the following parameters:
· From: Any of the existing rates or the cost price.
· Update mode: Increase or decrease (as percentage or price), or a fixed price for all items.
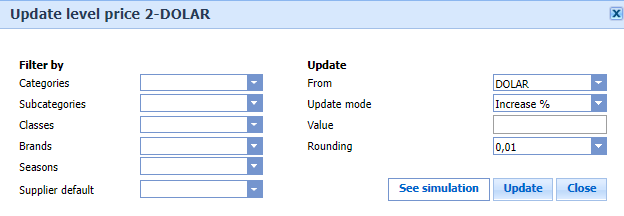
Additionally, the system allows you to view a simulation, prior to the final update. To do this you must click “See simulation”
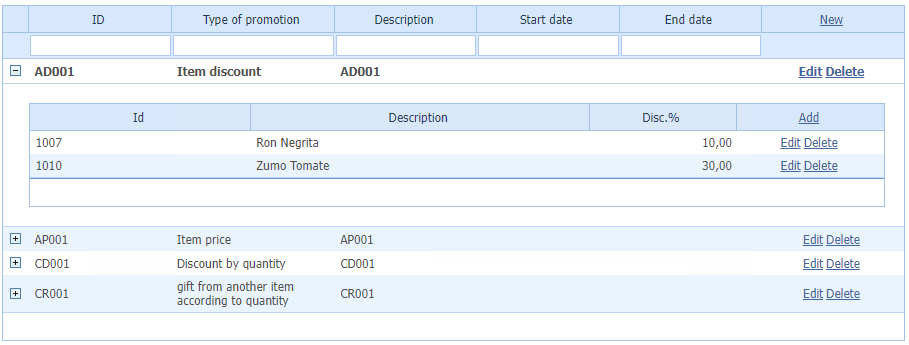
You can create different offers, which can be used at POS and web. To create a new offer, click "New", to modify an existing offer, click "Edit". Different types of offers are as follows:
· Quantity serve A / Quantity pay B: Allows you to determine the units that are served and those that are actually charged, the typical 2x1, 3x2, etc.
· Discount by quantity: Discount by item based on units sold.
· Price by quantity: Price by item based on units sold.
· Gift another item according to quantity: When a quantity of an item has been sold, another item is included at price 0.
· Discount on all items: Apply a discount to all items in the sale.
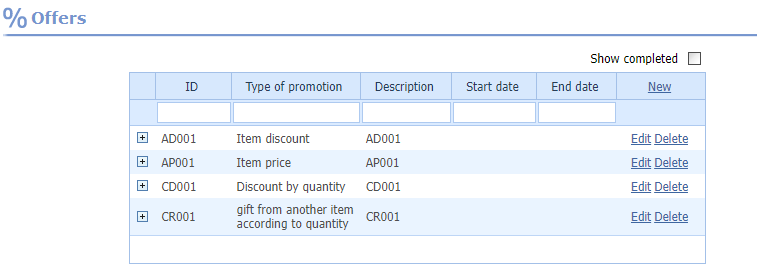
When creating a new promotion, you can determine the validity dates and the stores where it works.
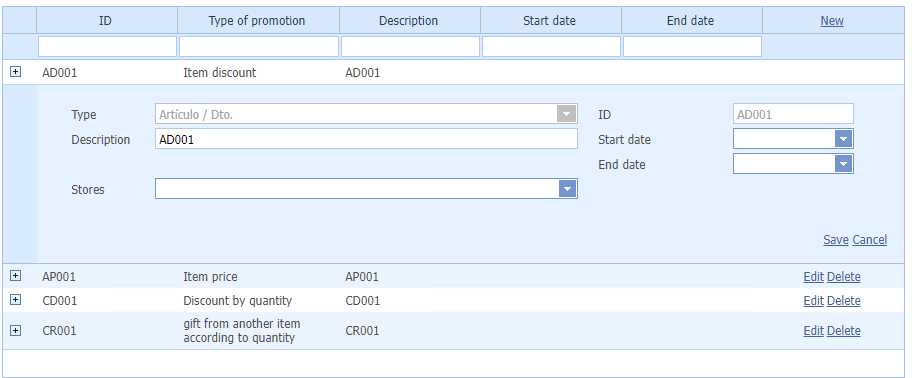
To edit the details of the promotion, display the promotion (+ symbol) and press "New" to add details or "Edit" to modify existing ones
4. Inventory
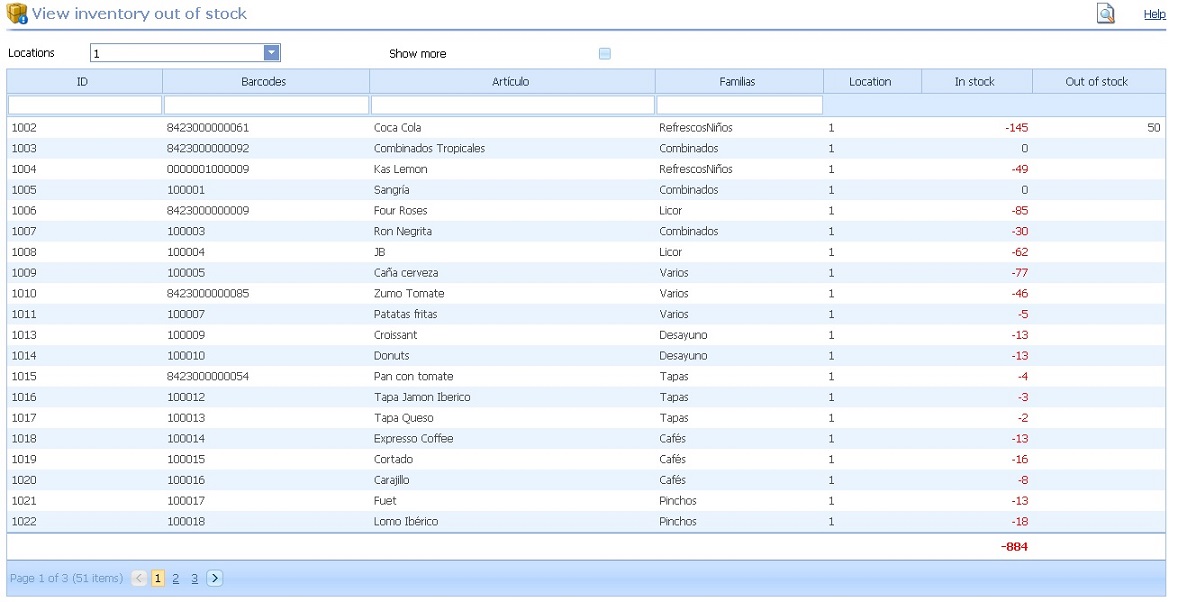
Information on current inventory or on the selected date. You can see the list without valuation, or valued at a cost price or rate. You can choose to see only the items that have stock treatment, more detailed information about the item, or more information about the stock, item classifications, image, etc... You can select one or more warehouses.

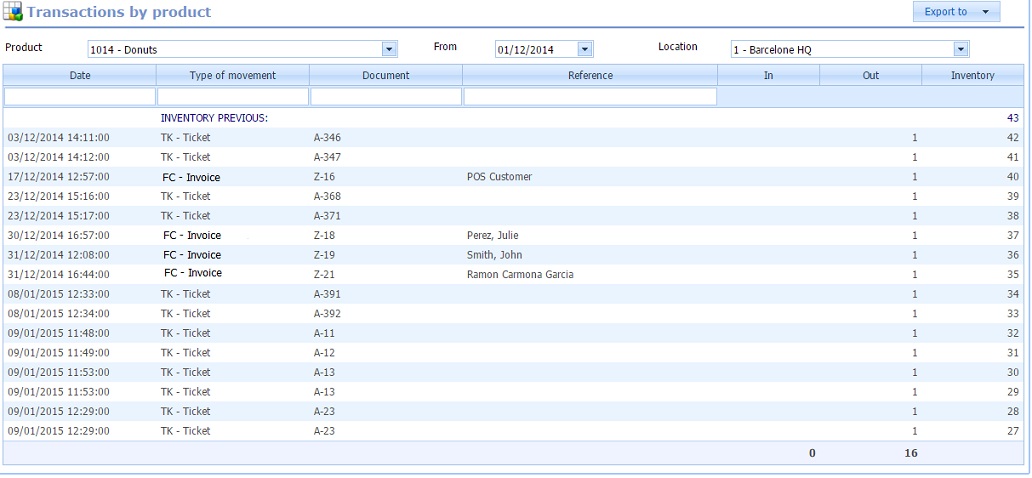
If you select a product, you will see information about their movements from a date and a selected location.
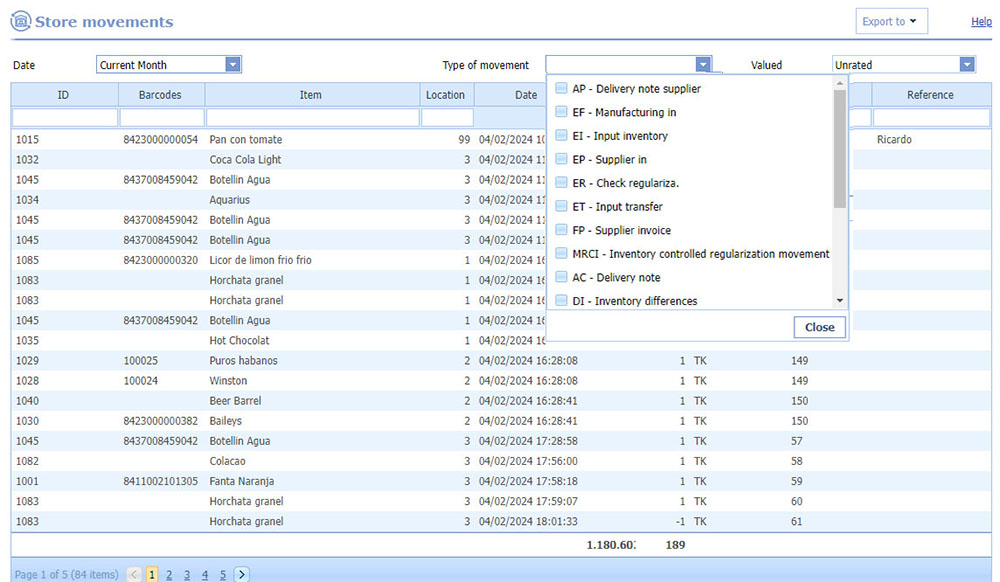
Information about all store movements. You must select a period of time and if you want to see the report valued or not valued. You can filter by store, by product, type of movement, document, etc.
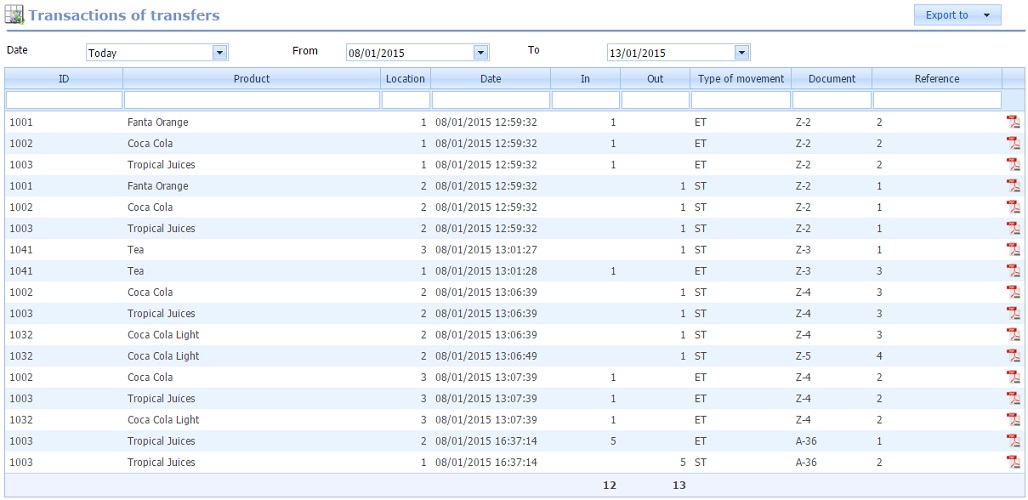
Information about in and out movements by transfer between stores. You can filter by stores, product, movement type, document, etc. You can see transfer document clicking PDF icon.
e) Automatic inventory replenishment
You can create automatically store orders (PRT) (1), or purchase orders (2), to cover sales of selected days (3), based on sales of the selected period (4) and product availability (5).
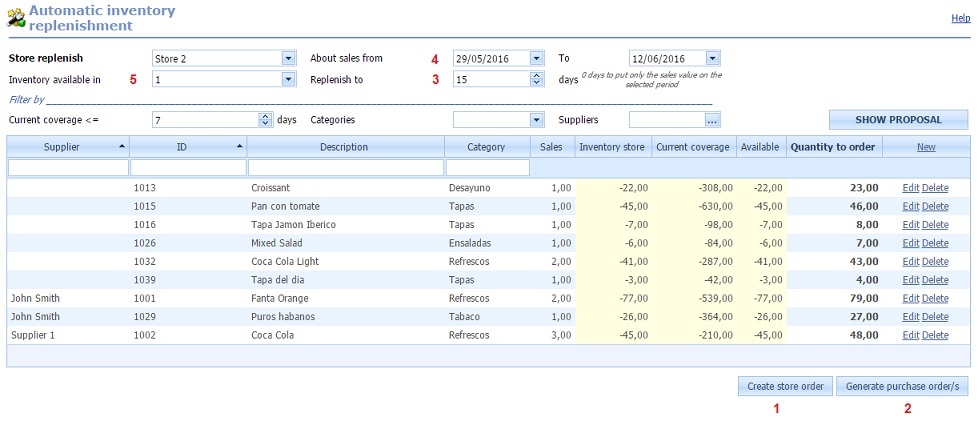
First, you have to select the store for which it is necessary to order merchandise.
Then the sales period which will be based for making the request and the days are needed to cover. If in the days necessary to cover it
you put a 0, it means that you will ask exactly what you sold in this period. Maybe you have some stock in some location,
so the system must take into account the available stock.
This option is very useful when you want to order to cover a particular season, such as Christmas, based on last sales
Christmas, you can place an order for stores to cover all demand for the next period.
You can use filters to display only products you want, for example you can filter for items that have a lower coverage to a
few days, by category, or items of a particular supplier. Once all the data, click on the button "Show proposal". With the proposal on screen,
you could edit lines to order more or less, enter or change the supplier, delete lines, or manually add items that are not within of the
proposal.
See replenishment orders have been made from the point of sale (winPOS). These orders are created when the POS demands products to the headquarter store. You can also create orders from web and serve them.
Orders can be next status:
·
Pending: All product are pending to serve, order and lines can be changed.
·
Partially served: Order has been served partially,
main data cannot be changed, but you can create, edit or delete lines.
·
Confirmed: Order has been checked.
·
Authorized: Order is ready to serve.
·
Held back: Is waiting to be checked, it cannot be served.
·
Finished: Order has been served fully or is finished.
To make an order only click on "New". Introduce main data, then click on "Add" to introduce products.

Where:
1: Show served, finished or deleted orders.
2: Make new order:

Add products:

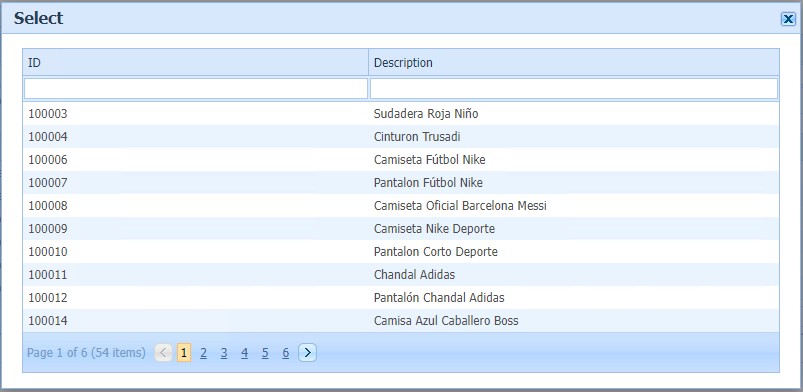
You can add details to the document by entering the product code manually or using the included search engine by clicking on  and selecting the item.
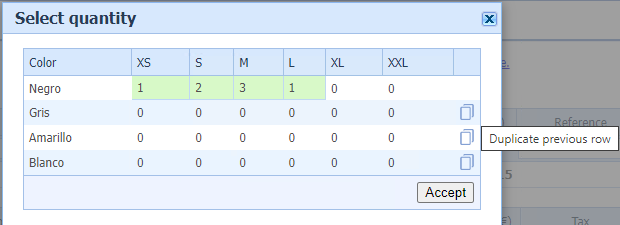
If the type of business uses sizes and colors and the items have attributes, a screen will be displayed where we can enter the units for each attribute that we want to include in the document.
Furthermore, if we click on the image  the values that you had entered in the top row will be imported, thus facilitating the entry when we have many attributes.
 Show order document to print or export.
 Serve order to store: You can serve order or some products by clicking on icon.When you confirm the order, delibery transfer will be
generated, also in/out inventory movements.

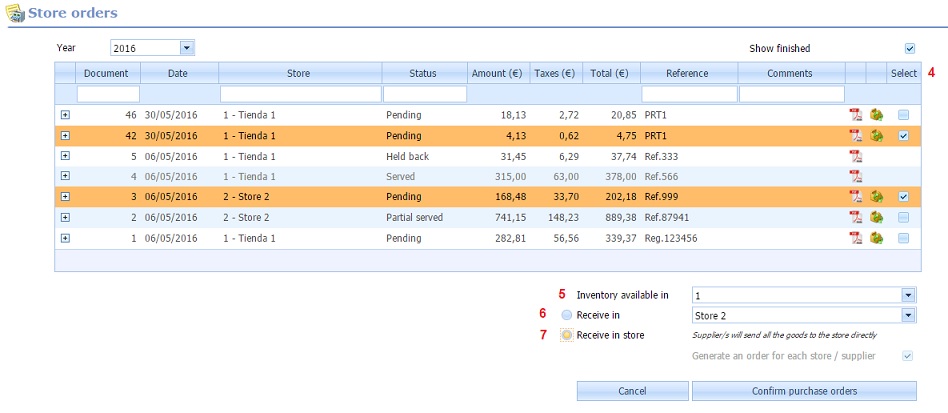
3: Select orders to generate purchase orders
(orders to supplier):Clicking on the link, options to create supplier orders will be enabled.
You'll have to select the orders you want to serve using the box "Select"
(4), once selected, you can place the order automatically based
on the stock of one, several or no one store (5).
You will have to decide if you want receive orders in only one store (6)
or suppliers send the order directly to each store (7).
List of orders, customers and stores, pending delivery. When you select the option to deliver the order  , the entire order will be delivered.
You can view and print the order by clicking on the image
  .
.

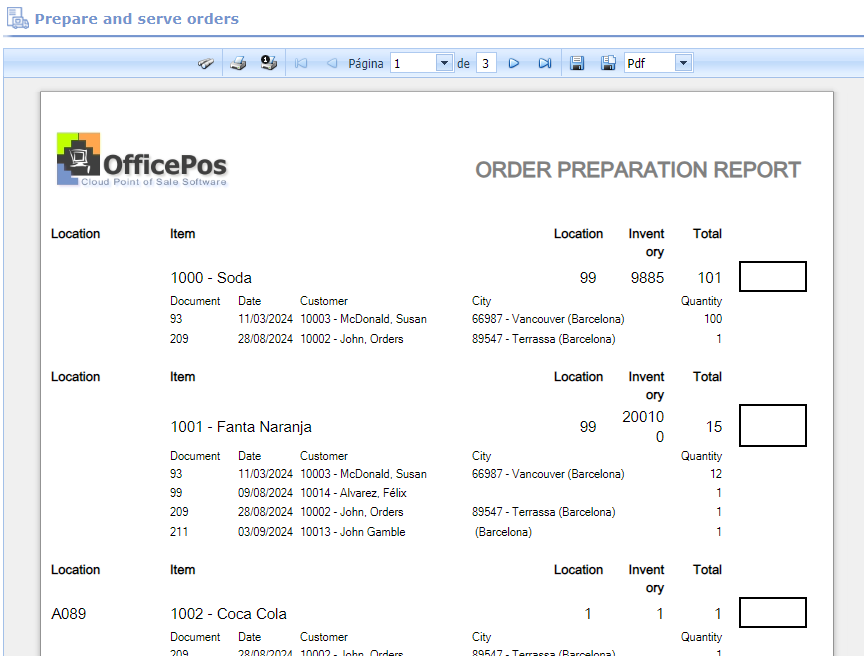
In addition, to help you prepare your orders, you can print a list of items sorted by the usual location in the warehouse. You can select more than one order to create this report, because it will show the location in the warehouse, quantity and corresponding order.

h) Transfer between warehouses
List of delivery notes for transfer to stores pending shipment. The delivery note can be viewed, printed or served.

Merchandise can be sent from one store to another, selecting the origin and destination of the delivery.
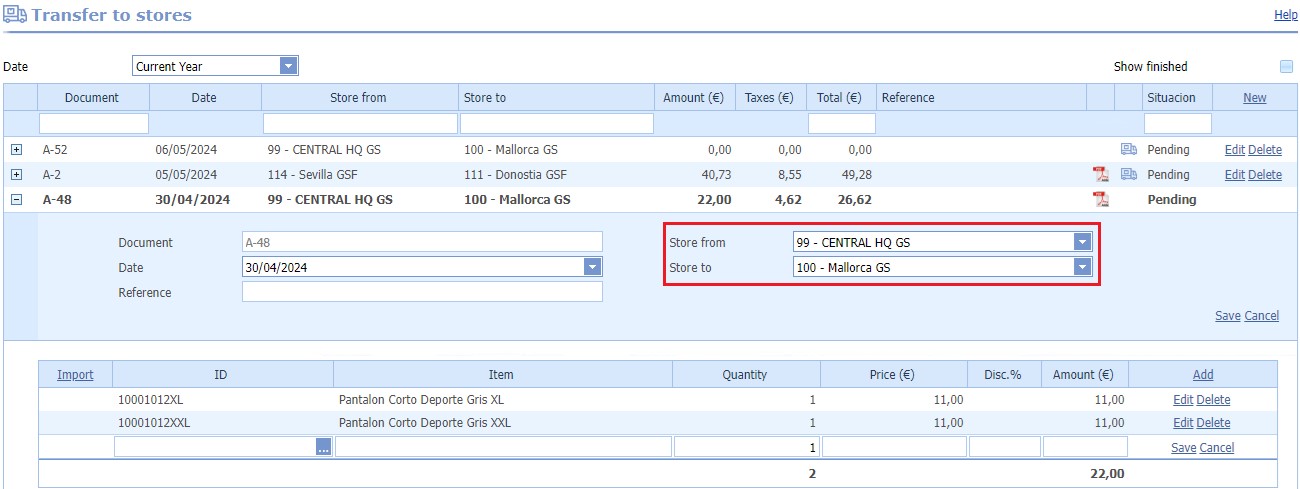
You can add details to the document by entering the product code manually or using the included search engine by clicking on  and selecting the item.

If the type of business uses sizes and colors and the items have attributes, a screen will be displayed where we can enter the units for each attribute that we want to include in the document.
Furthermore, if we click on the image  the values that you had entered in the top row will be imported, thus facilitating the entry when we have many attributes.

Saving lines implies the generation of a transfer note, but NOT the corresponding movements. The Delivery Note can be left pending and retrieved at another time to continue completing the transfer. You just have to select it from the list of delivery notes. You can also import the lines from other documents to facilitate the process, this is done from the details of the lines, clicking on “Import”. From here, you can select the lines of all those documents coming from Deliveries between stores or from Supplier Reception that have the origin warehouse of the document we are creating as the merchandise entry warehouse.

When you finish the delivery transfer and want to do the movements, you click on the button PERFOM TRANSFER. This will generate movements out of the origin store. If you have option "Validate incoming goods from stores in winPOS" activated, the transfer document will be available in the destiny store to validate and entrance movements will be generated. If this option is not activated,out and in movements will be generated automatically when you perfom transfer and delivery transfer will be finished.

Also, if the destination store is a franchise, the corresponding customer delivery note will be automatically generated, and you will be see to be able to make the changes that we consider appropriate.

Generates an input movement (ER) of the product chosen with the quantity introduced at the store you have selected.
Generates an output movement (SR) of the product chosen with the quantity introduced at the store you have selected.
To create and execute physical count. You have to select the store/location where you want to do physical count and date. You have to be introducing rows with the products and quantities you count ("New" in the last column), when you've finished a line, click on the "save" line. The physical count will be saved and you can retrieve it at any time to continue entering quantities, just select it from the dropdown "Physical count". To create or delete physical count click on the NEW button or DELETE button.

· Full physical count: By default physical count are rotative, this means that when the physical count is updated, only takes into account the products that exist in this. If physical count is FULL will be updated stock of physical count items and the rest of products will be update with quantity = 0.
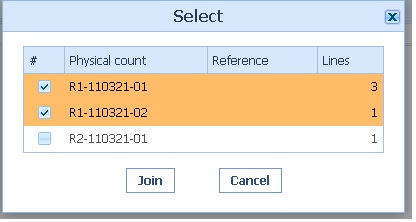
· Join physical count: You can select multiple physical count to join them into one. The physical count to which they will join, and inherit their characteristics, will always be the first selected from the list.
· Optimize: Sum and group the lines of the same item in a single record.
· Inventory differences: You will see a list with the differences between the stock on the inventory date and the stock reported in it.
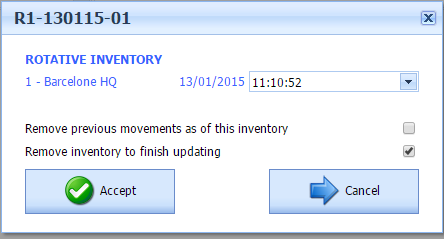
· Update physical count: To update the physical count you press the UPDATE button. This process will create the necessary movements to adjust the stock as physical count says. You can choose to delete the physical count at the end of the process or even delete all previous movements to physical count.
5. Purchases
From this option you can add, edit or delete suppliers

Orders that have been made to suppliers. Orders can have next states:
·
Pending: All products expect to be received, the order and its lines can be changed.
·
Partial received: It has received part of the order, the main data
can not be changed, only their lines.
·
Ended: The order has been fully received or has been finished.
·
Deleted: The order has been deleted.
To create a new order just you have to click on "New". The main data of the order shall be completed. Then clicking on "Add", the lines will be incorporated. If you wish, you can filter the products by associated supplier, checking "Select only the associated items from the supplier" box. When the order is completed, the user can send an email provider (if the provider has an established email).

New order:

Add products:

You can add items to the document by entering the product code manually or using the included search engine by clicking on the image and selecting the desired product.

If the type of business uses sizes and colors and the items have attributes, a screen will be displayed where we can enter the units for each attribute that we want to include in the document.
Furthermore, if we click on the image  the values that you had entered in the top row will be imported, thus facilitating the entry when we have many attributes.

Receiving from supplier: You can receive the order (or part of it) by clicking on
 . When you confirm the received products automatically
generates the corresponding supplier delivery note. You can check supplier delivery note from the option
"Receiving from supplier."

When you receive products from supplier, you have to saved them in the system by creating delivery notes. Make a delivery note means update product stock, adding new store movements with type "EP", for delivery note items that have enabled the treatment of stock. To create supplier delivery note is equal than "Purchase orders." You can add massive supplier entries from the option Import. This process also create the supplier delivery notes and adjust the stock automatically. If you click on the labels icon, the items labels in the document are displayed.

You can add items to the document by entering the product code manually or using the included search engine by clicking on the image  and selecting the desired product.

If the type of business uses sizes and colors and the items have attributes, a screen will be displayed where we can enter the units for each attribute that we want to include in the document.
Furthermore, if we click on the image  the values that you had entered in the top row will be imported, thus facilitating the entry when we have many attributes.

You can see the different supplier movements, input and output from stores (Supplier delivery note). You can filter by supplier, product, store or date. If you check "Show more" you will see information about the product: tax type, price, cost, category, bar codes, etc.

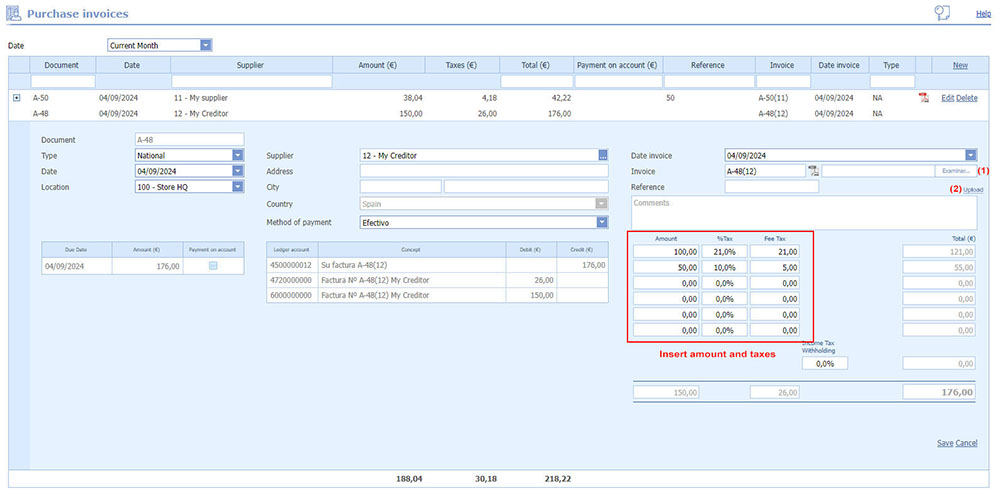
List of purchase invoices. You can attach the file provided by the supplier to each invoice. There are 2 types of purchase invoices, those from suppliers and those from creditors. From suppliers have items associated with the document, because they are proof of the sale of goods. For creditors are for performing a service, which is why they do not include items. Purchase invoices generate all the movements and records necessary for accounting, entries, bills to pay, etc...
You can import different supplier delivery notes to group them into a single invoice, click on the "Add Delivery Note" link. You will not be able to modify the quantities on those lines.

To attach the document provided by the supplier, click on (1) to select the document and then click on the "Upload" link (2). For creditor type invoices, you have to enter the amounts and taxes manually.
6. Customers
You can add, edit or delete customers.

The customer card is divided into separate categories to facilitate configuration.

· General: Basic data like, ID, name, direction, country, type of customer, associate the customer with a specific rate, etc.…
· Billing: Data on billing such as the associated price, series, currency, if there the customer has a discount or tax-free, etc…
· Financial: Accounting and collection data.

· Sent: Information that is necessary for the postal shipment of items.
·
Loyalty: If loyalty is enabled, you can assign a loyalty code or loyalty
card number manually, always have to meet the requirements placed on the configuration (prefix and length).You can also use the automatic generation by clicking on the link "Generate",
the system creates a loyalty code.
You will also see the customer points accumulated (points customer can spend), and you can add or subtract points manually, just put how
many points you want to add or subtract (in this case put them in negative) and then click on the link "Add", the customer's points balance will
be updated at that time. In points history, these movements are type "direct".
· Contacts: Data of the client's contact people.
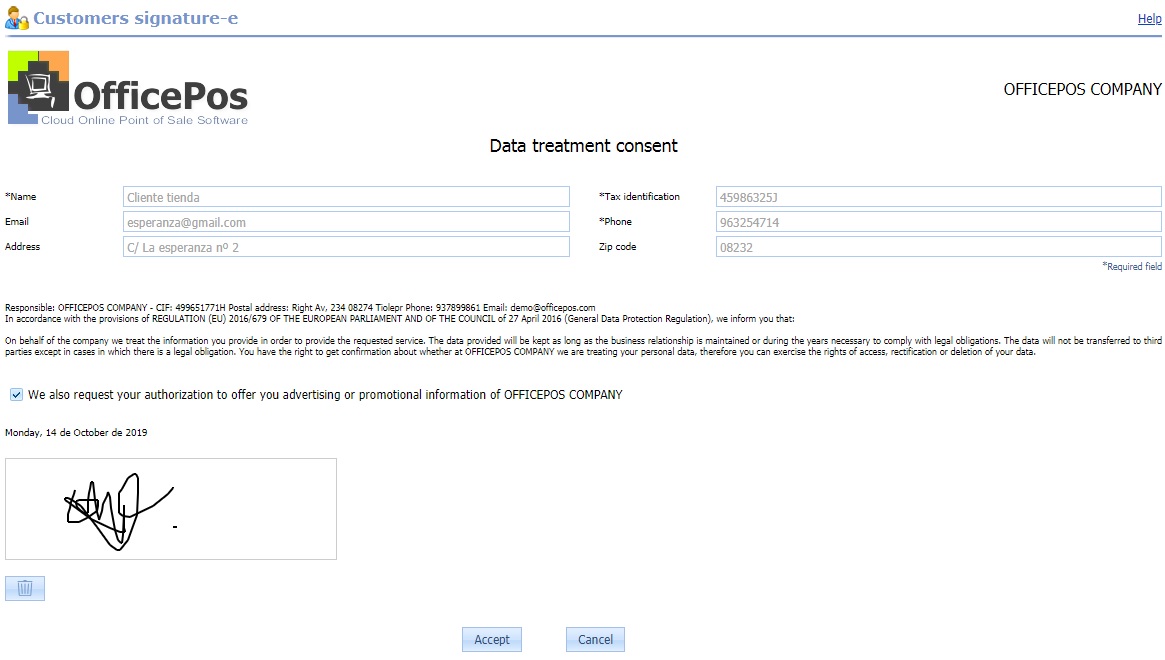
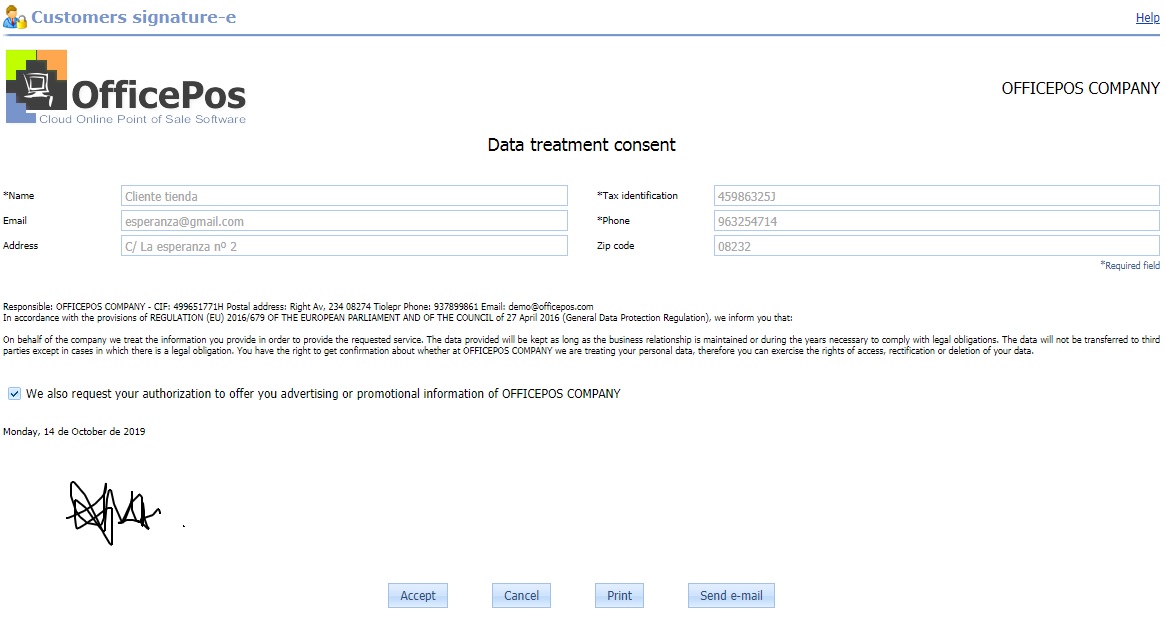
Information and acceptance of data protection by the client. You can consult and manage all related to data protection, newsletter and customer signature. The consent document may be consulted and sent to the client when the signature already exists

If a customer does not have data protection activated, it can be activated by clicking on the link edit and signing. After click on accept button, the data protection will remain registered. If a customer already has data protection activated, by clicking on edit, the newsletter can be modified and the consent document can be sent or printed.
You can add, edit or delete customers type, this types will be used in the customers card.

d) Coupons (only Premium user).
Discount coupons management to use from the winPOS.
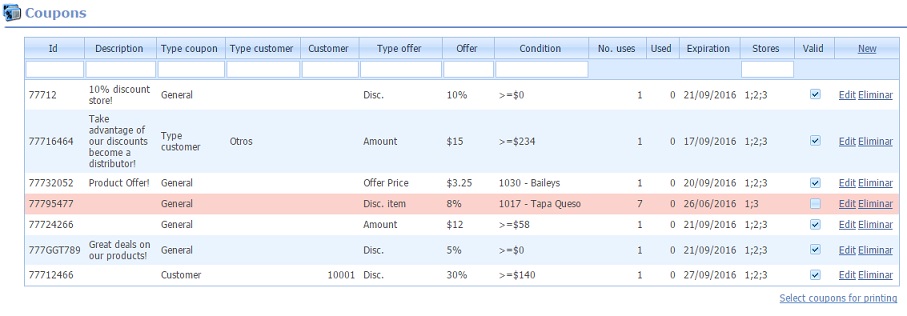
By default, the system assigns an id coupon automatically and randomly. You must be setting before from
My company option "Advanced -> Coupons" .
ID coupon have a minimum of 5 characters and a maximum of 13 and it can be alphanumeric. You can create a range of coupons, but only if
ID is numeric, for example you can introduce 10000-10020, and a maximum of 200 coupons are created by rank. ID coupon will be transformed
into a barcode when you print them.
You can select the stores where the coupon is valid, by default, all stores are selected.
Coupons can be associated with 3 kinds of people: Everyone (General), a type of customer (customer type selected), or a particular customer
(you must select the customer).
You need assign due date and a description if you want.
Uses number indicate how many times you can use the coupon (or coupons if you are generating a range) and how many prints will be made.
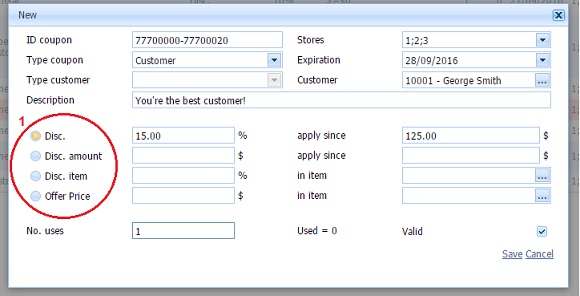
Are 4 different type of coupons (1):
·
Disc. apply since amount: A discount (%) will be applied in the sale if total
amount is exceeded. This total amount can be 0, and always will be applied the discount.
· Disc. in amount from an amount established: Monetary reduction is applied in the sale if a total amount established is exceeded.
·
Disc. about item:A discount (%) is applied to the selected item.
·
Price about item: An offer price will be applied in selected item.
To print coupons you will be click on "Select coupons for printing", you will see a column where you can choose the coupons to be printed by clicking on "OK" will display a preview.
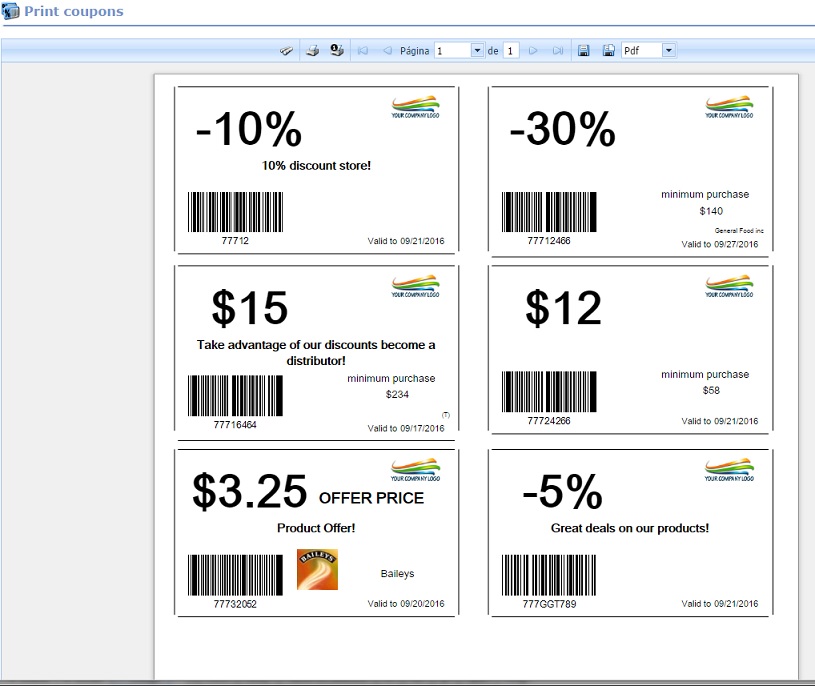
To use a coupon from winPOS, first you must enter products sale AND END OF SALE, read the coupon
through barcode or by write ID coupon, the offer will apply (if it can be applied) automatically.
You can only use one coupon per receipt, coupons are not cumulative. After using a coupon on sale, it will be blocked, you can't add more
products or modify existing ones. If you delete the line generated by the coupon, the sale will return to its original state and unlocked.
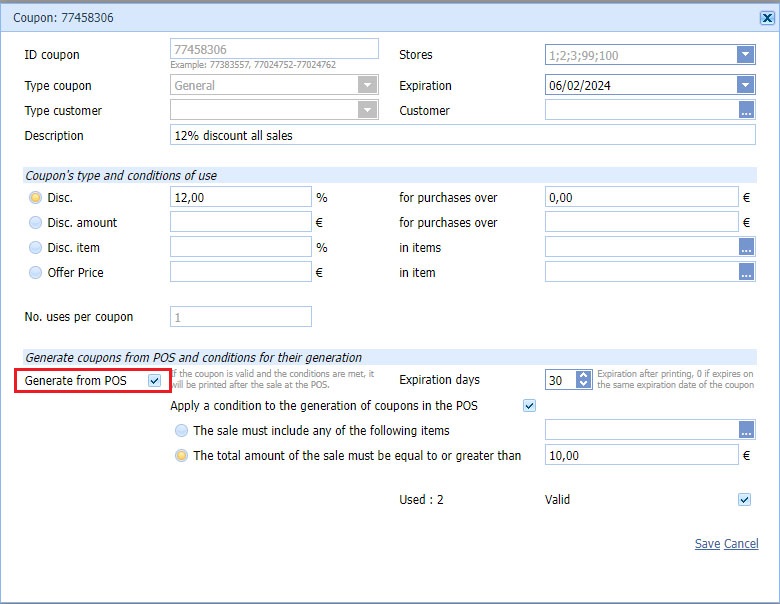
MAKING COUPONS FROM winPOS: In coupon screen, there is a box named "Generate from POS".
If you activate this option, winPOS will print coupons after each sale. This coupons type, can not be printed from
the web. This functionality works printed at the end of each sale in POS, all coupons marked with this option, which are valid, and they have the conditions configured for printing.
In the example below, the customer would receive a coupon every time their purchase was greater than or equal to €10.
The coupon will expire 30 days from its generation date and can be used to make a 12% discount on your next purchase.
e) Gift Cards (only Premium user).
Gift cards are used to offer a monetary discount to the customer, so that they can use it repeatedly, until the balance on the card is gone. Gift cards, like coupons, can only be used from winPOS. The operation is similar to that of coupons, with the only difference that a card is configured by giving it an initial amount and the card can be used at the point of sale, as long as the card has not expired, and has a balance.

While the card has not been used, settings can be changed from OfficePos. When it has been used once, the card is locked to the web, and can no longer be edited. The initial balance of the card and the current balance will be displayed.

f) Loyalty (only Premium user).
Loyalty points management , to use from winPOS. You can create different points promotions by product, by families, or any category you've activated (manufacturers, brands, seasons ...). The sale of any product inside a promotion, will make the points balance increases in the customer's account, only if a customer has a loyalty code associated.

Create a loyalty promotion:

- ID: You have to assign a unique promotion code, maximum 10 characters.
- Type: Select promotion type: Product, selected products generate points, Family, for all products belonging to the selected families generate points, subfamilies, classes, manufacturers and other activated categories.
- % rate price: Points percentage to be assigned when the product is sold with the usual price. For example, if you sell a product, included in a promotion points, with a price of $10, will be generated 10 points in the customer's balance, if the % price rate = 100. If the % price rate = 50, will increase by 5 points (50%), etc ...
- % offer price: Works the same way last point, except that this percentage applies when the product sold is promoted by other offer, such as a discount or a lower price than usual..
- Initial date: Date that begins this promotion.
- Due date: Date that expires this promotion (empty if don't).
Then and clicking on the link "Add", will be introduced items/family/etc .. that they will be part of the promotion.
Customer will accumulate points through purchases and he can spend on the next purchase or anytime. In winPOS a new method of payment PUN-Points will be enabled. When the customer wants to spend points, you only need to click on the POINTS button and the system will display the maximum you can spend on that sale. Points are used as a method of payment more.
g) Points history (only Premium user).
Show the historical points movements, points generated and spent (negative). You can filter or group by customer or loyalty number to view the total points accumulated.

You will see customer activity according to filters you set (period, activity, email, etc.). The list will show the last purchase made, the average ticket, loyalty data, etc... You can export the results to PDF and Excel to analyze them.

7. Sales
Quotes list pending finalization. To change the situation, you can check the "Accepted" box. You can also finalize a quote by converting it into a customer order, by clicking on the corresponding icon. When a quote is converted to an order, the situation automatically changes to Accepted.

You can add items to the document by entering the product code manually or using the included search engine by clicking on the image  and selecting the desired product.

If the type of business uses sizes and colors and the items have attributes, a screen will be displayed where we can enter the units for each attribute that we want to include in the document.
Furthermore, if we click on the image  the values that you had entered in the top row will be imported, thus facilitating the entry when we have many attributes.

In the document detail, you can enter an additional description for the line, inheriting it from the notes of the item's file or by writing it directly. You can also configure whether this description is printed or not.

List of pending customer orders. You can see the order, send by email to the associated customer, or serve it. To serve it, click on the corresponding icon.
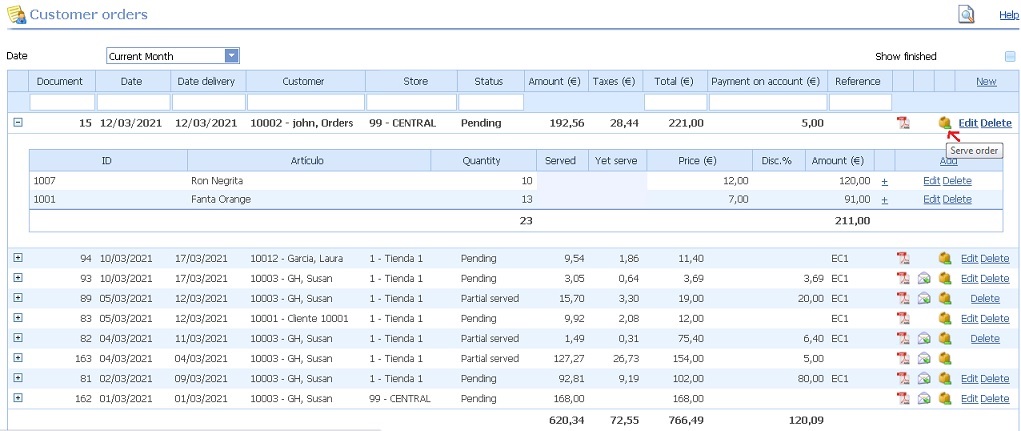
You can add items to the document by entering the product code manually or using the included search engine by clicking on the image  and selecting the desired product.

If the type of business uses sizes and colors and the items have attributes, a screen will be displayed where we can enter the units for each attribute that we want to include in the document.
Furthermore, if we click on the image  the values that you had entered in the top row will be imported, thus facilitating the entry when we have many attributes.

The order can be partially or totally served. It can also be finished without having served its entirety. To server an order, a customer delivery note or invoice must be generated.

List of customer delivery notes pending turnover. You can see the delivery note, send by email to the associated customer, or turnover it. To create the invoice, click on the corresponding icon.

You can add items to the document by entering the product code manually or using the included search engine by clicking on the image  and selecting the desired product.

If the type of business uses sizes and colors and the items have attributes, a screen will be displayed where we can enter the units for each attribute that we want to include in the document.
Furthermore, if we click on the image  the values that you had entered in the top row will be imported, thus facilitating the entry when we have many attributes.

List of customer invoices. You will not be able to delete or modify invoices that have been turnover, or that have been created from a POS. Also you can't delete invoices that have an associated advance.

You can add items to the document by entering the product code manually or using the included search engine by clicking on the image  and selecting the desired product.

If the type of business uses sizes and colors and the items have attributes, a screen will be displayed where we can enter the units for each attribute that we want to include in the document.
Furthermore, if we click on the image  the values that you had entered in the top row will be imported, thus facilitating the entry when we have many attributes.

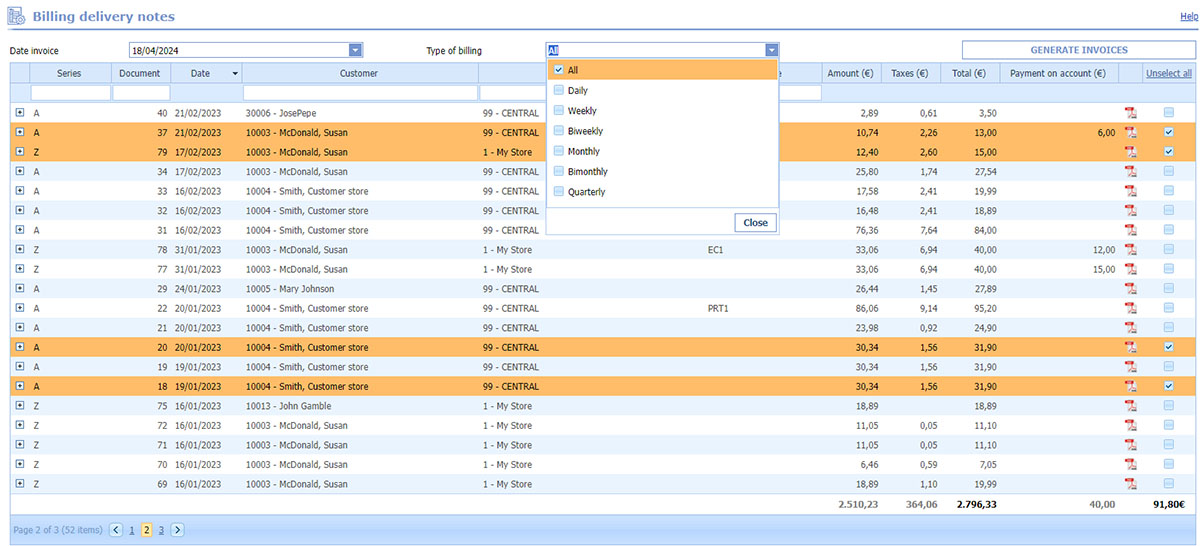
All customer delivery notes pending billing will be seen. You can filter by customer billing type, and see only delivery notes of clients with daily, weekly, monthly, etc...
When the records are displayed, you must select the delivery notes you want to invoice. Depending on the customer's configuration of the selected documents, an invoice will be generated for each delivery note,
or each customer's delivery notes will be grouped into a single invoice. The resulting invoice(s) will be created with the date you have set as "Date Invoice". Click on the "Generate invoices" button to start the billing process.
OfficePos currently provides electronic sending to the treasury of the Basque country (TicketBai) and to the treasury of Portugal (Invoice Xpress).
To see this menu option, you must configure the Treasury in a store in your system. From the sending to the tax agency, you can select the pending documents, and they will be sent to the corresponding tax office by clicking on the "Send" button.

8. Stores
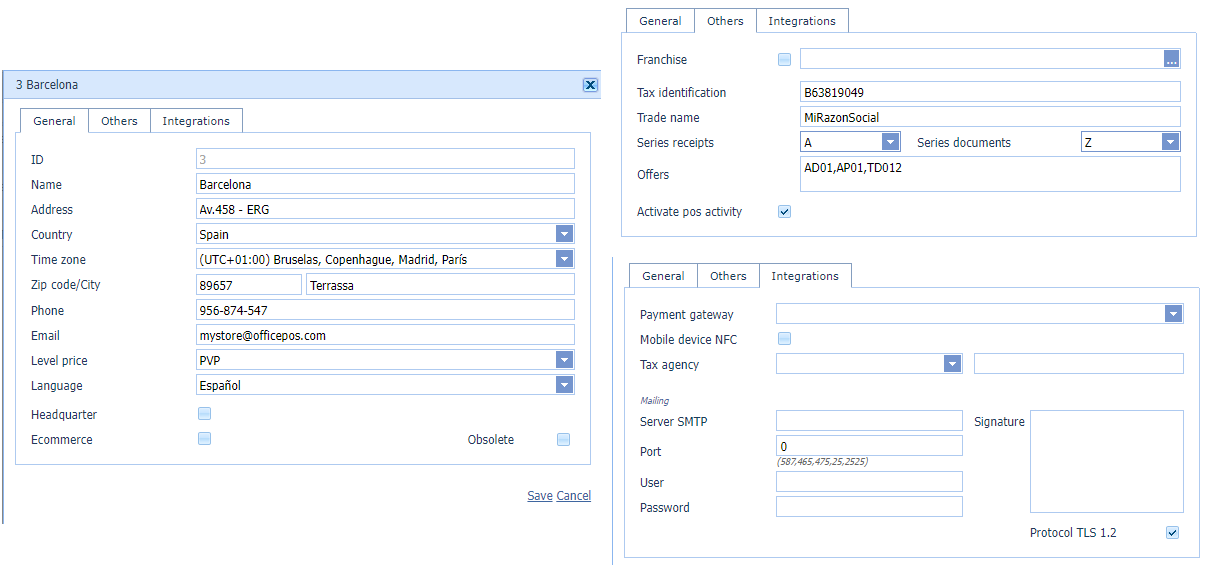
Management of our company stores. Only Premium users can have more than one store. The most important data for the store are:
- Time zone: Company can have many stores with different time zone.
- Rate: Rate to this store, and the POS belongs to this store
- Language: Default language for POS (although the user can decide which language to work when he start the POS). Prints are always made in the language of the store.
- Headquarter: Indicates if the store acts as a headquarter, inside the company. For example this would be indicated if we have more than one store and only one of them acts as a distribution goods store. Only can be one headquarter.
- Ecommerce: If the store has associated online commerce.
- Franchise: Indicates whether the store is treated as a franchise; if so, a billing customer must be associated.
- Series: Series for receipts and series for documents that will be used at the point of sale for generic sales or for different documents such as invoices, orders, delivery notes, etc....
- Activate POS activity: To have access from OfficePos to all the audit records that are generated at the POS. You can see the activity from Setup->Processes->See POS activity.
- Payment gateway: There are different payment gateways for card payments: PayTEF, ConexFlow, Sermepa, Dojo, etc.. Select the gateway from here and configure it from the POS record, or from the winPOS.
- Tax agency: Enable electronic sending to the tax agency of the Basque country or Portugal.
- Mailing: Email credentials that will be used to send documentation by the store, for example for the e-ticket at the point of sale.
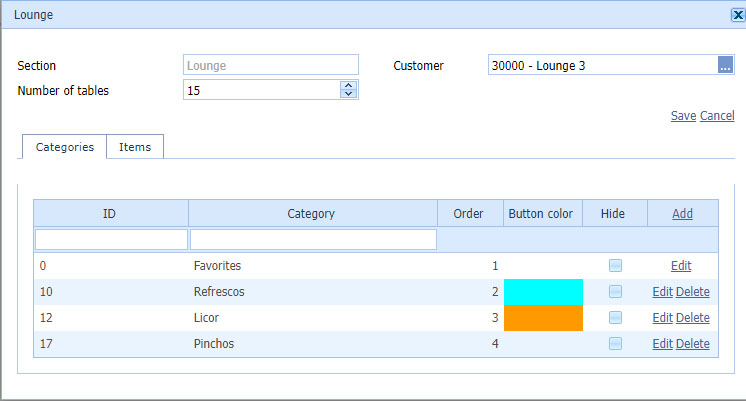
· Section / places: You can create multiple sections or environments for points of sale. For example, in the hospitality sector, you can have a section called "Terrace", "Dining Room", "Bar", etc...In other types of sectors, for example, food, you can have sections like "Butcher Shop", "Fish shop", "Bakery". To access the section configuration, click on the link at the bottom of the stores screen.

Each section can have its own rate, which will be that of the associated client. You can also have your own item catalog, and even your own display settings.

To create a section, you have to give it a name, and then select a client. If you want, you can also configure a number of tables, which will be fixed.
This is very useful in the Hospitality sector, if you want to have control of each table.
To finish, click on "Save", and the section will be created and you will be
able to configure it. If you don't select categories or items for a custom treatment, you will see the POS screen as always. If you want the section to have a different look,
you can add categories or items, to hide them (Hide), change the appearance of the button (Button Color), or the order in which it is displayed on the screen (Order).
Just select categories or items that you want to have a custom configuration.
From a POS, you can decide which sections you have access to, and you can use all of them, you just have to press a button to change sections. If you want to know more about customizing the section, such as the arrangement of the tables, assigning an image, or setting the color according to the status of each table, consult the Point of Sale Help manual.
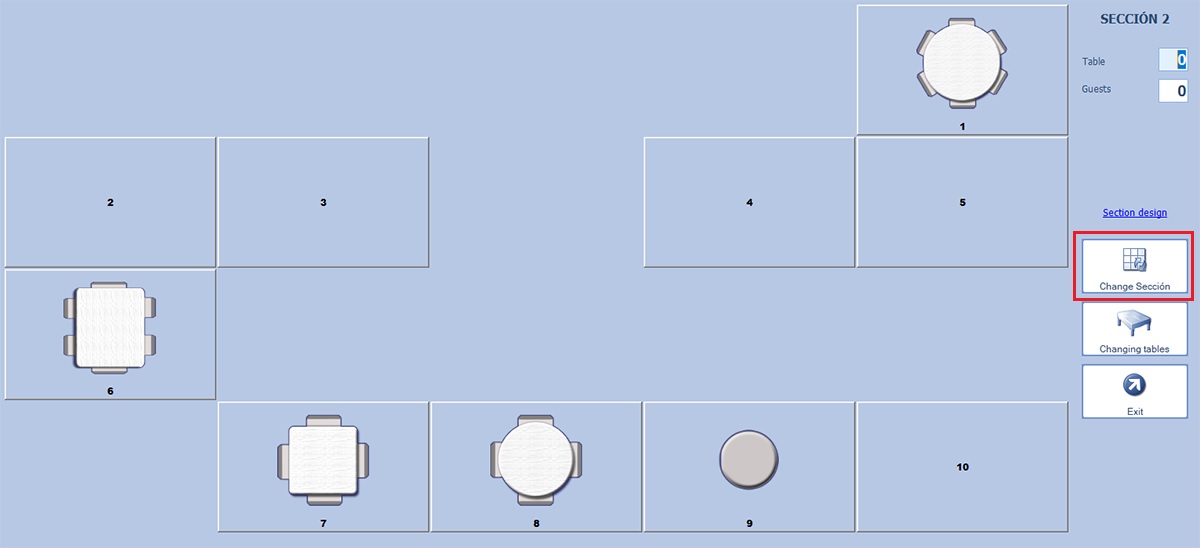
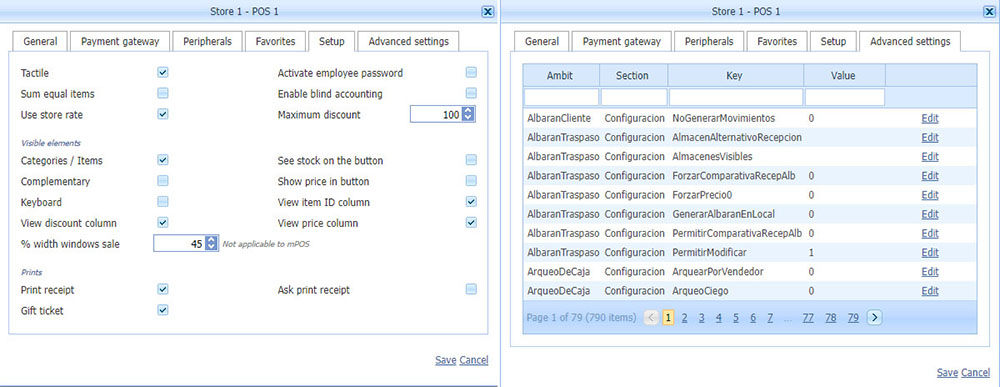
· Cash Register / POS: A store can have as many POS (points of sale - POS) as you want. Each POS has its own independent receipt numbering. You can also have a parameter configuration or layout fully customized screen. It's possible to have several POS from the same store with different configurations and designs (multi-business establishments).
To register a new point of sale, click "New". You can create a new POS by duplicating an existing one. A duplicate will be created exact version of that POS, including peripherals, designs, parameters, etc. Once POS box is created, you can modify its configuration by clicking on "Edit".

- General: Basic data of the POS, default customer for sales, activate the eTicket, type of establishment, non-accessible sections, etc...
- Payment gateway: Configuration data according to the payment gateway for payment with card selected in the store.

- Peripherals: The peripherals, printers, drawers, etc., for POS, must be configured from winPOS. In this section of the POS, the printer configuration is only for web sales systems, webPOS or mPOS. These systems can be configured as the printing method, print server or any printer with IP protocol.
What is a print server? A print server is a software that runs under winPOS and receives printing requests from any mPOS. This way, it is not necessary to install any printer on the mobile device.
To activate this configuration, you need to have a winPOS installed with its printer devices configured (receipt printer, invoice printer, kitchen printer, etc.). In the configuration of the POS associated with winPOS, in the Peripherals winPOS section, you must activate the check "Activate print server" to this POS to act this way. On the other hand, the POS that will be used from mobile devices (mPOS) must be indicated to use this print server from the mPOS / webPOS Peripherals section.
- Favorites: Items that you will see in any sales system (winPOS, mPOS or webPOS) as regular or quick access items. You can configure specific items or show the best-selling items.

- Setup: Most common parameters to be configured at a point of sale.
- Advanced settings: Other parameters of the point of sale. For advanced users.
From this option you can add employees as you want. These employees / cashiers are the store staff that will work with the POS. No confuse with OfficePos users. A OfficePos user only is necessary to logging into the OfficePos system, once identified, the POS will ask you which employee want to use to make the sale.

Editing an employee, you can assign a password (you have to put in the POS when an employee is requested for sale).
You can also assign a store, this way you can decide if employee only can works a specified store, or empty if he can works in all stores.
There are 3 levels of permissions:
Employee: only can do receipts and invoices
Manager: he can do a lot of operations except modify design.
Supervisor: no limitations
From the "Permissions" tab you can configure the permissions for each winPOS and mPOS task.
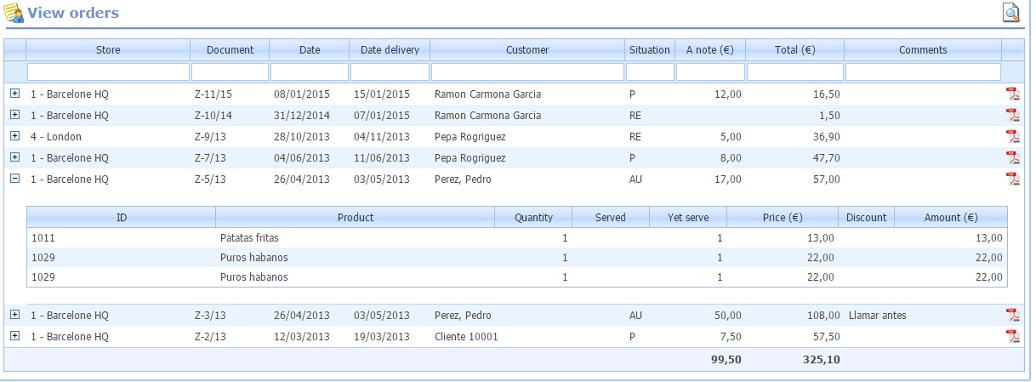
List of customer orders that have been made from POS. You can see and print, but not modify, a customer order can only be managed from the POS that generated it.
From this screen you will see all the movements made by the POS. Besides of sales, you can also consult the payments, charges, deposits, etc ... You can export the list to PDF or Excel.

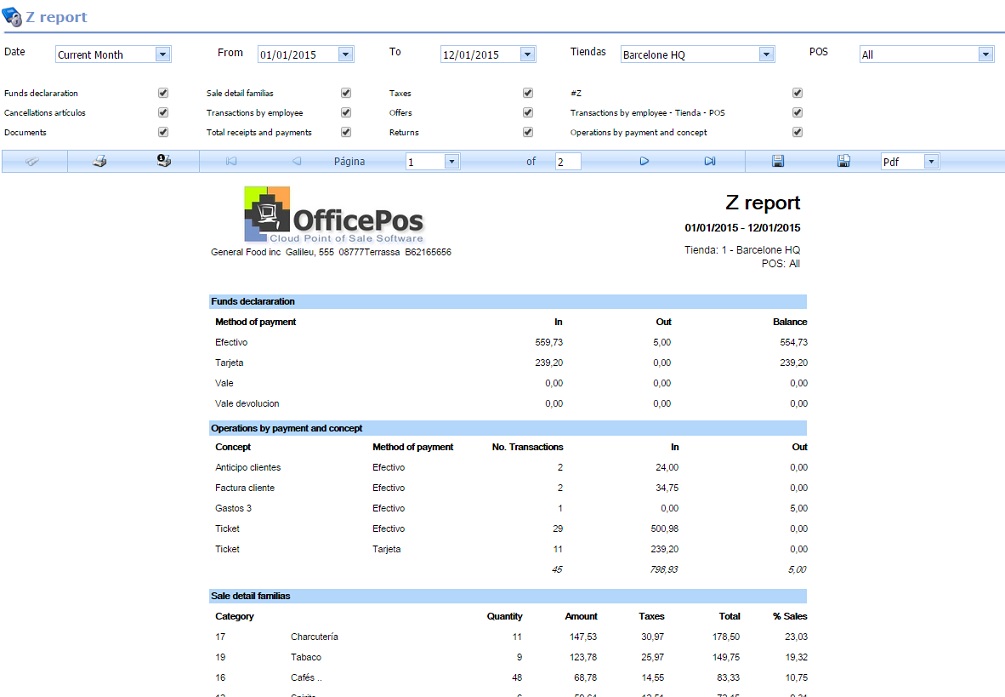
This report shows you all activity of a store and POS during a period. You can see the sales by method of payment, by categories, refunds, tax, transactions per employee, etc ... The report can be printed and exported to multiple formats.
You can send a message to one or more stores. These messages will be seen from point of sale. Select the stores you want to send a message, type your message and press the SEND button.

9. POS
a) Download point of sale for Windows (winPOS)
Will be downloaded setup.exe to install OfficePos Point of sale (winPOS) for Windows. This POS is installed easily and quickly. Do not consume resources at the installed machine and supports much more functionality than webPOS and mPOS. It is free and functionality is as simple as webPOS. Not dependent on active internet connection (only Premium user).
Tutorial OfficePos Point Of Sale
Download OfficePos Point Of Sale
b) Point of sale mobile - mPOS
Sales system that can be used on any device that has internet access. It can be used on mobile phones, tablets or computers.
c) Basic point of sale – WebPOS
Point of sale online incorporated into the OfficePos website, installation is not required, but it requires a constant internet connection. It is a point of sale with the basic functions, which are described below:
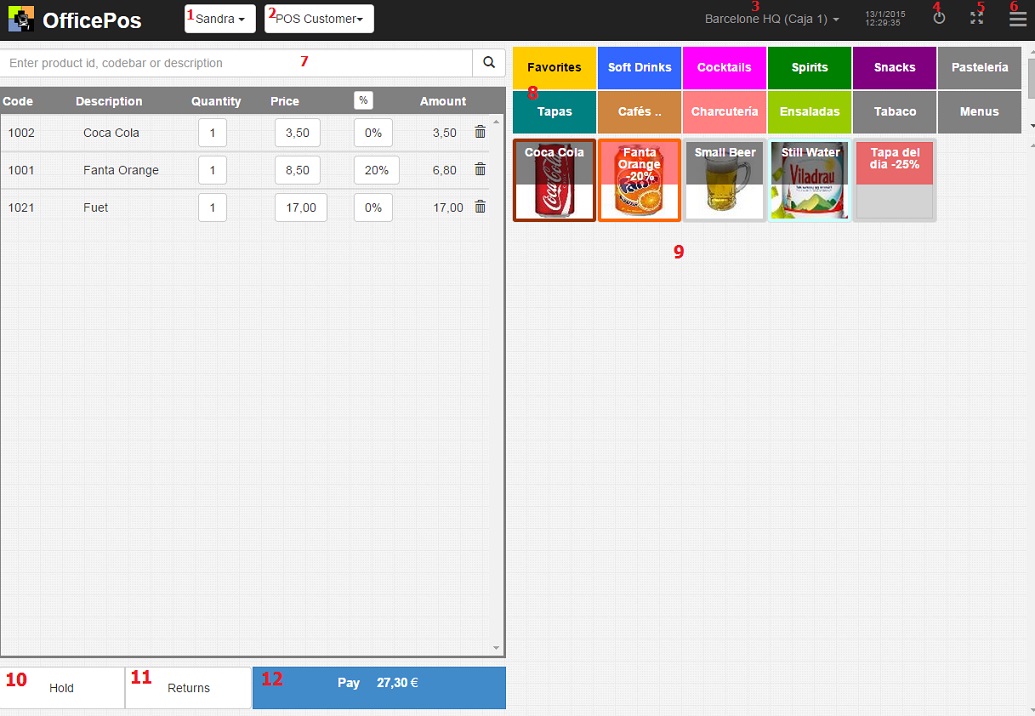
1: Employees menu, select employee to make a sale, you can change employee any time.
2: Customer menu, select customer associated to current sale. You can change customer any time.
3: Store and POS which you are working. The sales you make are related with this store and POS.
4: Exit to WebPOS y back to OfficePos web.
5: Maximize WebPOS screen.
6: Menu options: From this menu you can access the various features of WebPOS.
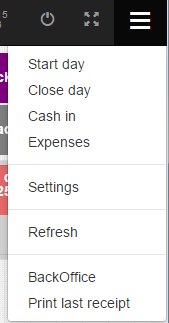
· Start day: Do a start day to POS.
· Close day: You can choose doing X (Funds declaration) or Z (Close cash).
· Cash in: Do a sale or deposit.
· Expenses: Do a payment or output funds.
· You can Access OfficePos web to configure some POS features. See POS configuration.
After modify any data from configuration is recommended option menu “Refresh” this way the changes are visible in WebPOS.
· Refresh: Reload WebPOS
· Backoffice: To Access OfficePos web, opens another tab in explorer.
· Print last receipt: Prints the last sales document.
7: From here you can enter a barcode, description or product code to search. "*" is not necessary. The search results you will see in the space marked with a 9. If the search results in a single product, it is incorporated automatically in the sales screen.
8: Space to categories. From POS configuration you can select if you want to see only the favorites, or see all NO hidden categories. By selecting a category, you will see the products.
9: Space to products: Shows you products belonging to the selected category. From POS configuration you can choose the information that appears in the button of each item, price, stock, color, etc ...
10: Leave the current sale on hold. If you click on this button the current sale is put on hold and you can create a new one. To recover any sale, you press the button and select the one you want.

11: If you click on the RETURNS button, the products you select, will join the sales screen with a negative sign.
12: Pay: Once introduced all products, if you click on the PAY button,you will see a screen to select the payment, enter the amount received, select whether you want to print, create eticket or issue an invoice instead of a receipt.
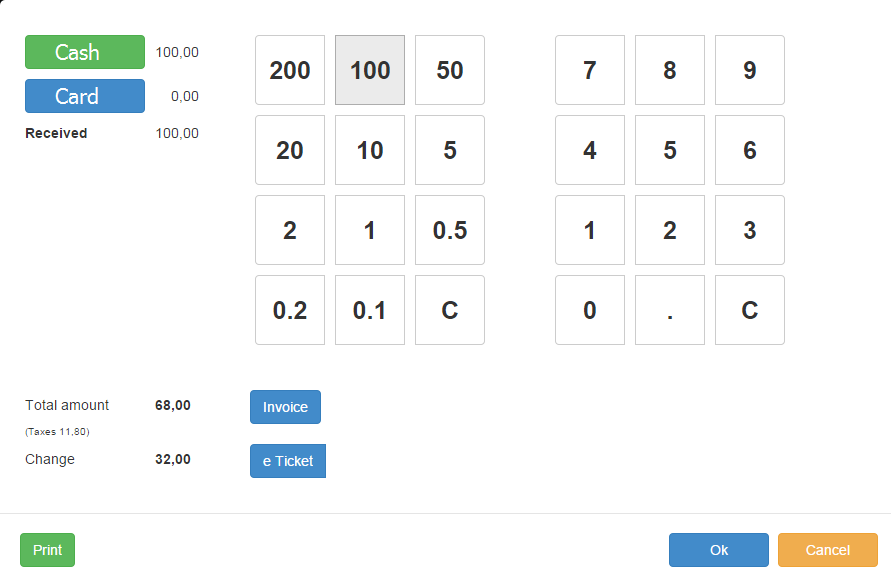
The green buttons indicate selected options, in this case, the method of payment is cash and print is active. If you want to generate an invoice, you only have to click on the INVOICE button. If you want to generate an eRECEIPT, you click on the button and POS ask you customer email. After you select the options you want, click on OK and the sale is made.
d) Differences webPOS – winPOS - mPOS
Information about differences between the webPOS, mPOS and winPOS (for Windows).
10. Financial
From this option, you can do all the operations to manage movements of clients, suppliers, banks and various accounts. You can also manage the financial portfolio (collections and payments) and you can also link with an accounting system.
From this option you can create, edit or delete the company's bank accounts or entities.

To create a new bank, click "New." To edit one that already exists, "Edit" on the bank line. In the account or bank file, there are the basic data: code, name, address, country, IBAN, accounting account, etc... In the Contact tab, you can enter contact information.
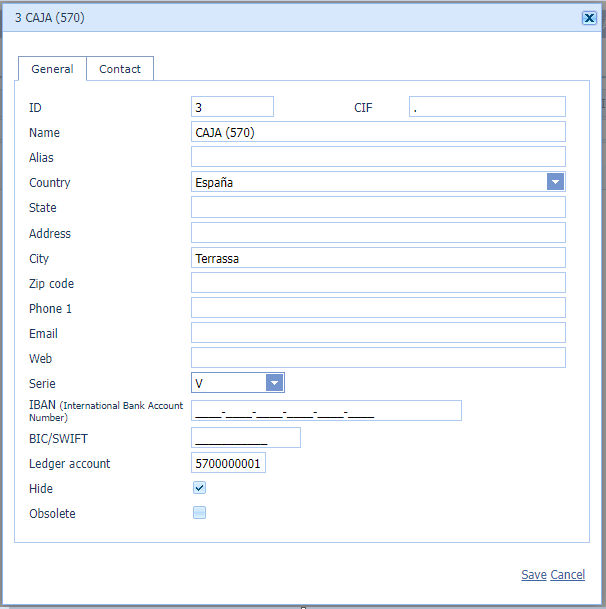
You can see the movements generated by the activity of the account or bank, when making an operation against a client, supplier, or another account or bank. You can also check the current balance of the account or bank and, in addition, see only the movements of active entities, selecting the period and the associated series.
The system obtains an initial balance, according to the selected period (PREVIOUS BALANCE), and shows the movements to the current date.
Additionally, when they are movements associated with invoices (purchases or sales), if they are visible, you will see an icon to view the document.

Management of collections, payments, and other types of operations with an account or bank. The necessary movements are created and if there is a linked accounting system, the accounting entries are also generated to be able to transfer them to accounting.
Within this operation, the financial portfolio is also created (bills and/or receipts to pay), where new bills or receipts to pay will be updated and/or created if necessary, depending on the concept. In the case of operating against clients or suppliers, you will see the pending bill or receipts to pay, which you can select to carry out the update, the movement will be generated for the account or bank for the total, and the new bills or receipts to pay
d) Customer balance and movements
They are movements generated by the client's activity, by leaving a payment pending, making an advance payment or an invoice. From this screen you can check the client's current balance, filter by a minimum balance amount or see only the movements of active clients (with activity in the last 3 years).
You can also see the invoices by clicking on the document icon ![]() or access the bills by clicking on the icon
or access the bills by clicking on the icon ![]() .
.

e) Charges
Create charges against an account or bank. The movements are created and if you have a linked accounting system, the accounting entries are also created and then transferred to accounting.
From this option the financial portfolio will also be updated and new bills will be created if necessary. You will see the pending bills, which you can select to update, the movement will be created for the account or bank for the total, and new bills, if necessary.

List of pending customer bills.

You can edit the bills to change some of their characteristics.

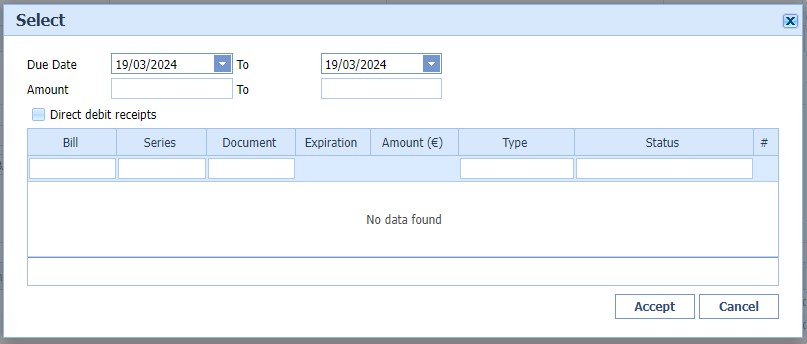
Create new bank remittances.

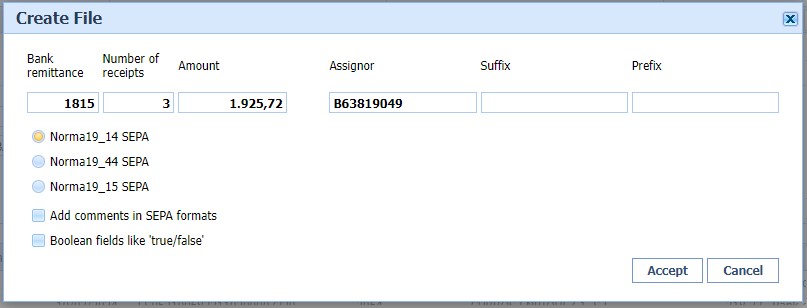
Remittance management, you can associate pending bills with the remittance. A file can be created for the bank, according to SEPA regulations, and it is accounted for if there is a linked accounting system


h) Supplier balances and movements
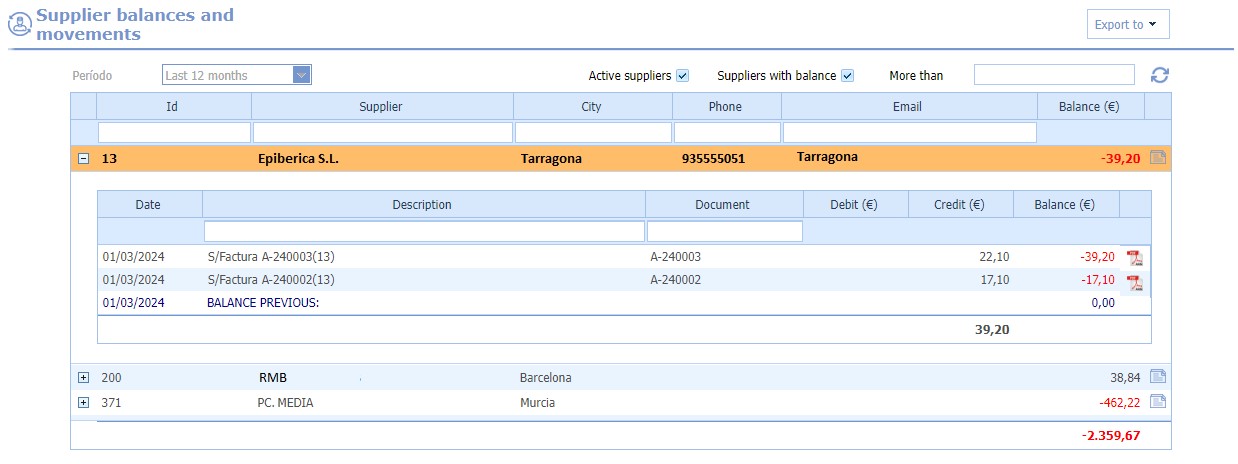
Movements generated by the supplier's activity, by leaving a payment pending, making an advance payment, an invoice or another type of financial concept. You can also check the supplier's current balance, filter by a minimum balance amount, or see only the movements of active suppliers (with activity in the last 3 years).
You can also see the invoices by clicking on the document icon ![]() or access the receipts to pay by clicking on the icon
or access the receipts to pay by clicking on the icon ![]() .
.
Manage payments against an account or bank. The movements are created and if you have a linked accounting system, the accounting entries will also be created to transfer them to accounting.
Furthermore, in this operation the financial portfolio will be updated and new receipts to pay will be created if necessary. You will see the pending receipts, which you can select to update, generating the movement for the account or bank for the total, and creating new receipts to pay, if necessary.

List of pending receipts to pay.

You can edit the receipts to pay to change some of their characteristics.

It allows the accounting of SALE and/or PURCHASE invoices, as well as movement entries.
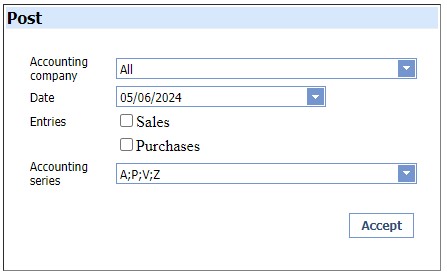
For accounting, you must select the accounting company to be processed, and you can determine the associated document series for the process. In addition, this process will take into account all invoices and movements up to the selected date. Once the process is accepted, a single ZIP file will be generated, with all the files generated, which will be downloaded to the local computer.
11. Analysis
Company sale data statistics
Information by sales per store, transactions number, receipts, payments, benefits, and clicking on the link "More" you will see information about top 10 products sold in the store. You can export the list to PDF or Excel.

Information about sales per employee and store, transactions number, receipts and payments. You can export the list to PDF or Excel.
Information about sales, amount and transactions number grouped by time of day. You can filter by period or a store. You can export the list to PDF or Excel.

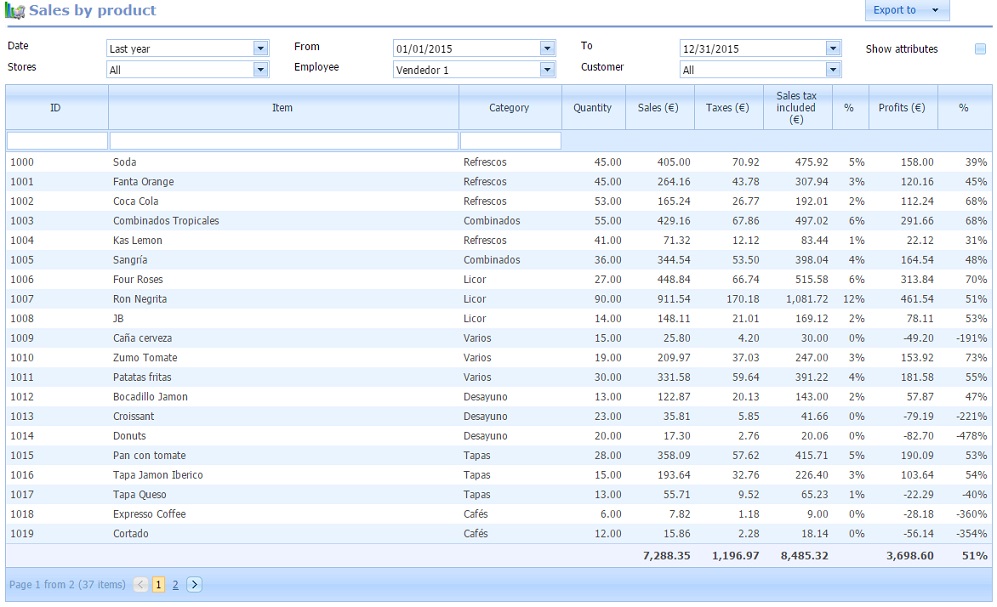
Information about sales per product. Quantity sold by product, amounts, tax, benefits, etc... You can filter by a period, store, employee or customer. You can export the list to PDF or Excel.
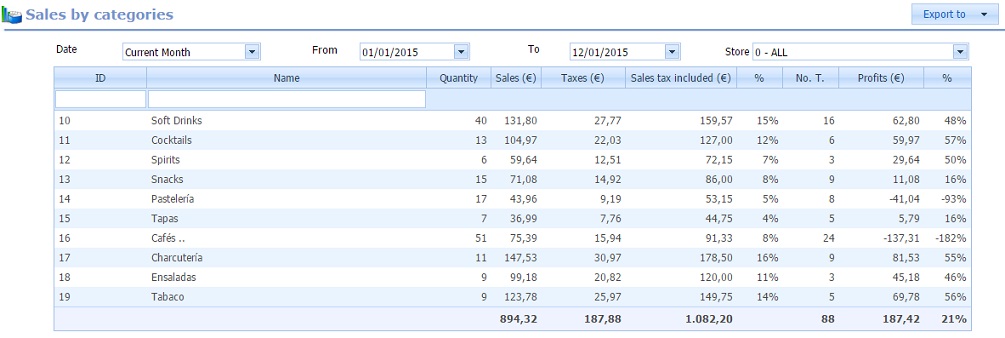
Information about sales per category. Quantity sold by category, operations number where it appears, amounts, tax, benefits, etc... You can filter by a period or a store. You can export the list to PDF or Excel.
Sales amount by subcategory, operations numbers where it appears and taxes. Possibility to filter for a period. You can export results to PDF or Excel.

Sales amount by classe, operations numbers where it appears and taxes. Possibility to filter for a period. You can export results to PDF or Excel.

Sales amount by brand, operations numbers where it appears and taxes. Possibility to filter for a period. You can export results to PDF or Excel.

Sales amount by season, operations numbers where it appears and taxes. Possibility to filter for a period. You can export results to PDF or Excel.

Information about sales per customer. You can filter by a period or a store. You can export the list to PDF or Excel.

Information about sales per customers type. You can filter by a period or a store. You can export the list to PDF or Excel.

Information about purchases per supplier. You can export the list to PDF or Excel.

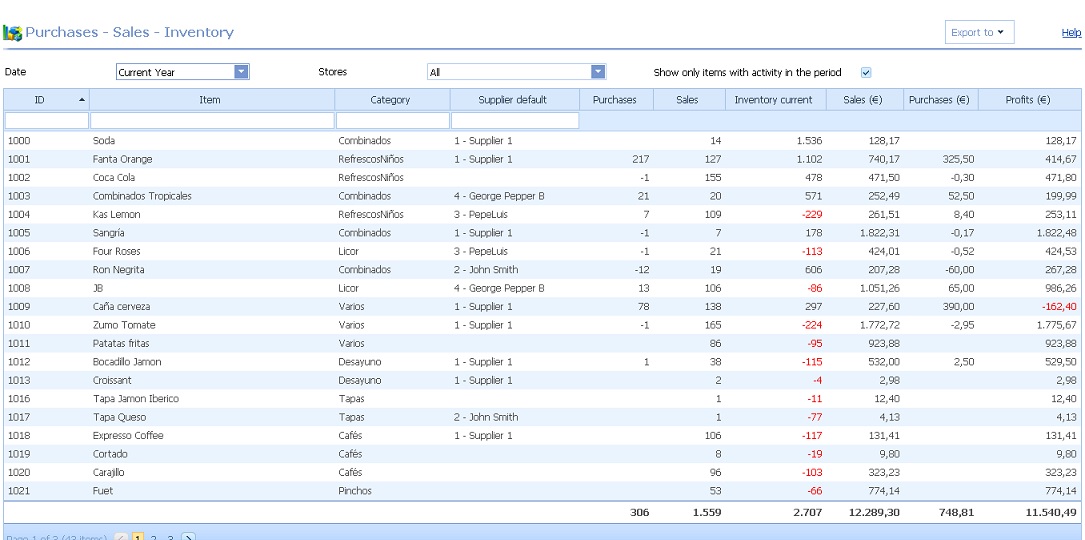
m) Purchases - Sales - Inventory
List where purchases, sales and margins data in a selected period are shown. The current stock per item is also displayed. You can export the list to PDF or Excel.
12. Administration
Your business data, from here you can configure your entire company.
· General: Basic data, name, address, contact information, country, logo, language, email, etc…
o Languages: Management of the different languages that the company can operate with. The default language associated with the company or stores cannot be deleted. Different languages can be assigned to stores, customers, users, etc.

· Settings: To select the default rate used by the company, default taxes when you add a new product, if prices are or not included taxes, series, currency and everything related to the formats of the company (number of decimal places, thousands separator symbol, etc ...). These data are completed by default when the user is registered in OfficePos depending on country selected.
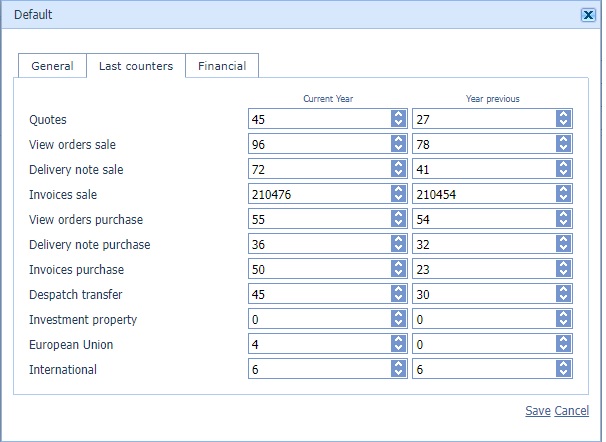
o Series: Series are used to identify and classify different operations. By default OfficePos provides the series A that cannot be deleted, because at least one series must exist in the system. You can create as many series as you want and assign them to stores, clients, suppliers, banks, etc....

Each series has associated counters for each type of document, both for the current year and the previous year.
o Activate color / size: If your bussiness is retail or you work with models, you must actívate this box, then you can use color and sizes. More information here.
o Complementary products: To actívate this features in your products. More information here.
o Days as a novelty: Number of days that the item will remain as novelty once it has been registered.
o Show picture in list: To show item's image in your lists
o Show supplier in list: To show usual supplier in the list of items.
o Show only items associated with the supplier from purchases: In purchasing documents, you will only see items associated to the selected supplier.
o Show obsolete: You will not be able to select clients, suppliers, stores, warehouses, items, banks, etc. marked as obsolete for new operations.
o Features: You can actívate until 4 different features to your products. You can use any name to reference them. To change its name go to Transaltions.
o Extras field items: You can enable different types of extra fields, if you need more fields than those provided for the article. You just have to give the field a name.
· Translations: If you want to call, for example, products, "items", put here this literal. The same for all categories, attributes, features, concepts...
· Loyalty: Possibility to activate coupons for stores or customers loyalty through cards and purchase points.
Ø Activate management: Coupon management option will be enabled from customers option menu (premium users only).
Ø ID prefix for coupon: Coupon ID can be associated with a prefix or not, in any case, coupon ID is an alphanumeric code with a minimum of 6 and a maximum of 13 caracters (including prefix if any).
Ø Associated product: Product to associated the discounts, for example, If you want to use a coupon with $5 discount in a sale, when the coupon is read from winPOS, a new line will be created with this item code and an amount of -$5 , this will be deducted from the final amount $5. You need to select an item to enable the management of coupons. If none is selected, the system will create a product COUPON by default.
o Points: Points are generated in the customer's balance when you sell products with points on offer. These points can then be used to apply discounts on the next sale.
Ø Activate: Point management option is enabled.
Ø Expiration (in months): When the points are generated, they will put an expiration date from the date of creation. You can only spend unexpired points to discount on next purchase. If the value is 0, the points never expire.
Ø Loyalty prefix code: Prefix have to start number/loyalty card every customer who wants to loyal.
Ø Loyalty length code: Exact length must have the loyalty of each customer (including loyalty id code). Is necessary all loyalty codes use the same prefix and they are the same size so that from winPOS can be identified.
· Dashboard: Visible elements in main screen.
o KPI's - Key Performance Indicator: You can configure which KPIs will be visible from the dashboard, as well as their position.
Ø Sales summary: Shows the sales information for the period you have selected (sales, taxes, average ticket, profits, etc...) This KPI will be fixed at the top of the screen.
Ø Last sales: Latest sales operations made by the company.
Ø Top 10 products: Top 10 best-selling items (according to the period you have selected). You can hide some items (shopping bags for example) and decide the order, by sales amount or units.
Ø Sales per store: Sales made by different stores (according to the period you have selected). It also shows you a comparison with a previous period.
Ø Sales per category: Chart where you can see the percentage of sales according to the category (according to the period you have selected). You can hide some categories.
Ø Sales per time period: Chart showing the amount of sales in hours, days, months or years (depending on the period you have selected).
Ø Sales by country: Chart showing the amount of sales by country. Accessible only if there is more than one operating country in the system (according to the selected period).
Ø Top 10 customers: Top 10 customers who buy the most (according to the selected period). Customers marked as generic will not be seen.
Ø Pending charges: All pending charges will be displayed: pending receipts, to be collected in the next 30 days, unpaid, etc.
Ø Pending payments: All payments pending to be made will be displayed: receipts to pay, estimated taxes, payroll, social security, etc...
Ø Sales documents: Information on pending documents, budgets, orders and delivery notes.
Ø Orders: Information on the different types of pending orders (customer orders, supplier orders, POS orders and store replenishment orders -PRT).
Ø CashFlow: Shows pending collections and payments, and the current balance of the company.
Ø Financial state: Shows income and expenses made in the last 12 months.
Ø Financial state last 12 months: It shows in a graphic way, the income, expenses and average balance of the last 12 months.
o Others: You can include wholesale sales information (not stores) in the KPIs, or hide Retail data if the type of business does not include store sales.
· Financial: Configuration accounting data. You have the possibility of associating OfficePos with an external accounting gateway such as: VisualGest Conta, ContaPlus 2012, Sage50c Accounting or A3. To associate it, you just have to activate the accounting check and select one from the list. You can also configure all the company's accounting accounts, such as purchases, sales, taxes, clients, etc. If you want to register new accounting accounts, click on the "Accounting accounts" link. To create new financial concepts, on the link "Financial concepts".
Ø Accounting accounts: You can manage accounting accounts for the financial management of the company. You just have to provide an account number and a description to register.
Ø Financial concepts: There are many financial concepts that OfficePos provides by default, however, you can create new concepts if you think necessary.
· Mailing: Information about the company's email account. You can also define the subject and body of the messages that are sent, through the web, to the customers.
· Advanced settings:
o Others:
Ø Maximum records by request: Top of records cloud returns to APP and POS requests. If the request returns more than this number, a filter screen will be showed.
Ø Maintain historical sales at the POS: Total days historic POS sales remains in order to be able to recover or consult old operations. It is advisable to set a number of days, in order to maintain optimized POS data. 0 to keep the full history. Old transactions will always remain on the website to consult.
Ø Validate incoming goods from other stores in winPOS: With this option actívated, POS had to confirm incoming goods from other stores. POS will only see transfer document to its store. POS can change quantities received before confirm movements. See transfer stores.
Ø Direct distribution between warehouses on the web: When making deliveries between stores, in and out merchandise is done automatically, without the need to validate the entry manually from a POS. You can only select this option if Validate incoming goods from other stores in winPOS is activated.
Ø Block replenishment orders if unable to serve: If this option is active, will be checked the availability of the order quantities and if it is not possible to serve, the order will not be created or will not be confirmed/authorized.
Ø Business Intelligence (BI): OfficePos offers you the possibility of activating Business Intelligence (BI) for better data optimization and faster data presentation. It is recommended for businesses with a very high volume of activity that involves the processing of hundreds of thousands of records. Contact OfficePos for more information.
Ø Logo labels: Image that will be printed on the label templates that incorporate the corporate logo.
o Last counter:
Ø Indicates the current fiscal year the system is working with, and the last barcode created.
· Processes: Various processes that can be carried out in the database.
Ø Delete transactions: You can delete all the transactions and initialize counters. NO WILL BE REMOVED nothing else, such as products, customers, employees, payments methods, etc. Only sales transactions.
Ø Delete data: You can delete massive products, coupons, etc..You can use filters availables in this option.
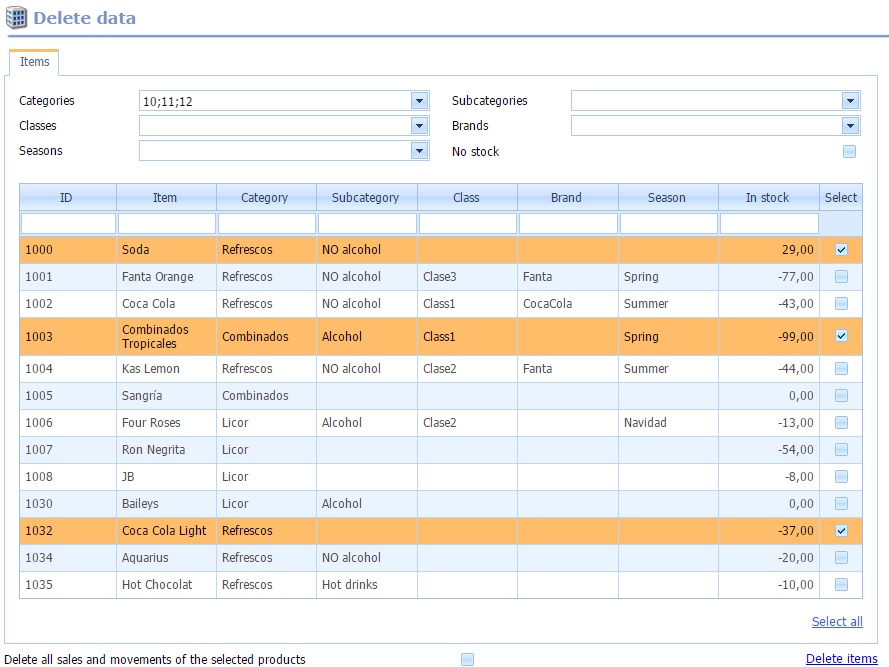
Ø Set obsolete items: It will update the selected items as obsolete. When an item is obsolete, it's not displayed at the POS, or on the web, if this has been established by company configuration.
Ø Update sales stadistics: Update stadistics with all new features you add to products (subcategories, brands, seasons, etc.)
Ø See POS activity: To see point of sales activity. POS should have activated "Active POS activity" from its configuration to send information to the cloud. See stores.

Ø Optimize company: Database data is optimized, deleting temporary, regularizing inventory, etc ...
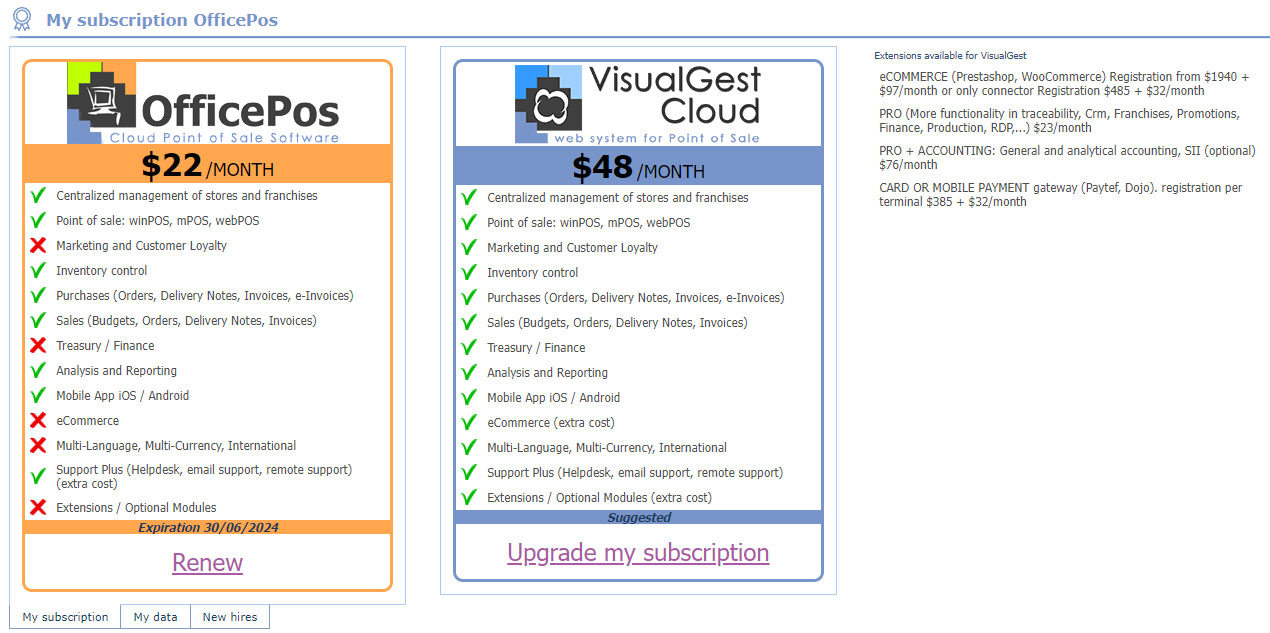
Information about the OfficePos subscription. From this menu option you can subscribe at the end of the trial period, renew or change the current subscription to a more advanced one. You can also hire additional services or extensions. You will see information about your current subscription, users and contracted services, orders placed, invoices, etc.
From this option you can access and edit different users.
The FREE users only have 1 user OfficePos and can not add more. If you are subscribed, you can add as many
users as you have hired.
First you have to hire the necessary users through the "My Subscription" option, then you can add them in the system by assigning them an user
and a password. Remember you need as many users as POS working simultaneously.
Only can exists an Admin user (default user that was registered in OfficePos).
Only the administrator user, or another user with
administrator permissions, can access and modify other users. A user without administrator permissions can only modify THEIR own data
(password, name, language..).
To change the password just need to edit and enter the new password and confirmation.
You can also set the permissions for each user, and the language that will be used in the POS.
The mailing configuration, at the user level, is available, and will be used if the company mailing is not well completed.
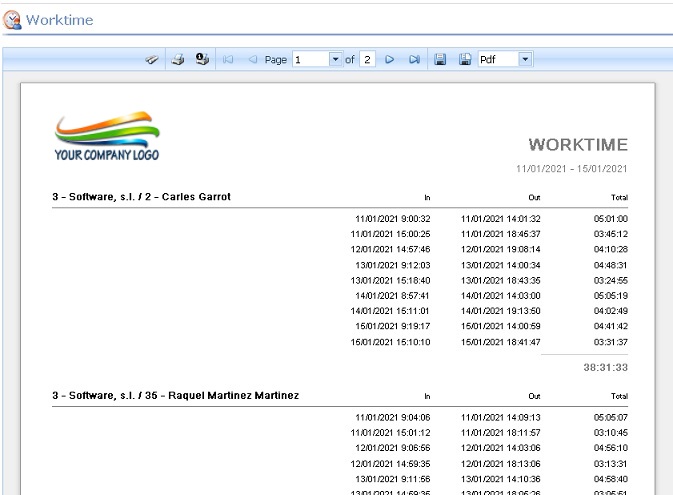
Listing and management of the worktime of the different employees. You can filter by period, store or employee and view their clockings
through the preliminary presentation in 
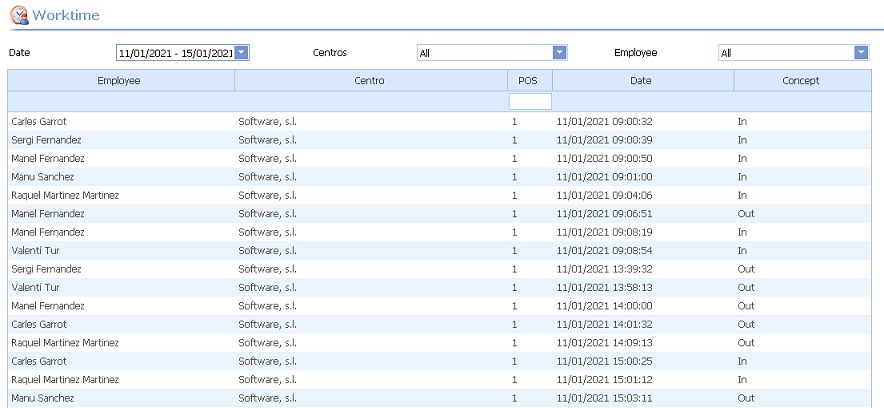
Users with administrator permissions can manage clock-ins afterwards and report possible absences and their justification. To do this, you must first select an employee. Once selected, you can perform a clock-in by clicking on the "Clock in / out" button. You will see a screen where you can report an entry, exit, or both, always selecting a day and time first, and it is mandatory to report the reason for the operation.
If you want to report the reason for an absence, click on the “Report absence” button (by selecting an employee first). Select the day of the absence and report the reason.
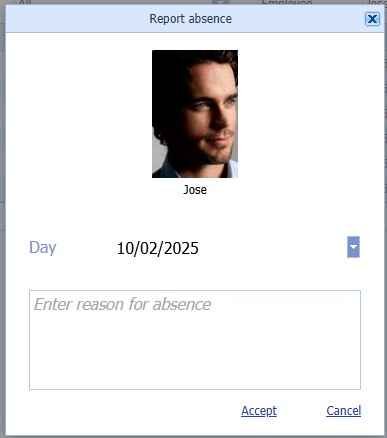
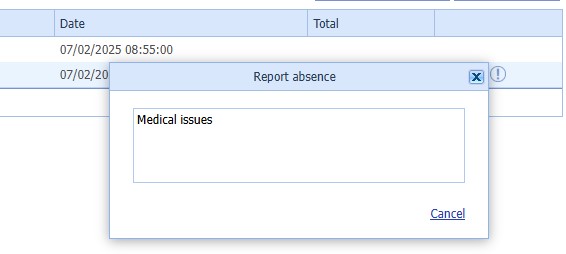
In the list, by clicking on the icon  you will be able to see the reasons for absence.
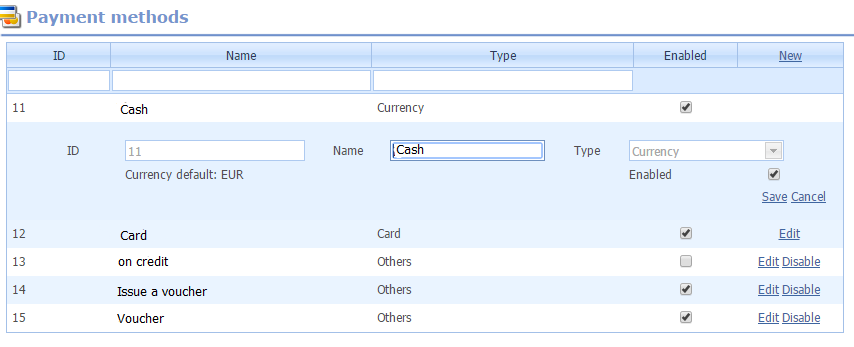
You can create as many payment methods as you like. Payment methods Cash and Card are fixed, can not be disabled at the POS. All other payment methods are delivered by default (credit and vouchers) can be disabled if you want. When creating a new payment method you have to indicate a payment type "money", "card" or "other". Depends on the payment type, the POS will treat one way or another.
Tax management. Enter ID code and percentage.It's possible to configure different tax percentages for each store.
Management of the different currency exchanges, the company currency (in bold) is always used as the base currency, which has a 1-1 conversion.
Locations management. When you add a store, a default location also is added. A store always has an associated location, but a location does not have to have a store associate.
i) Export data (only Premium).
You can export company data to CSV (Excel) as products, categories, customers, suppliers, employees, rates and other categories activated.
You can import the data of the company from CSV (Excel). On this screen you will see the EXACT format you have to
import data. For see an example just move the mouse over the explanation of the format.
Once you have the CSV/TXT file to import (it can be edit with a notepad), select format how it’s created (field separator) and if its first line
is a header description or not. Then SELECT FILE and press IMPORT button.
At the end of the process the web shows you how many
records have been processed correctly, and those who do not. If there are errors, you will see a document with an explanation.
· Import examples:
PRODUCTS / ITEMS (add and edit):
Code, Description, Notes, Category, Subcategory, Class, Brand, Season, Barcode, Costprice, Tax, Value, Level price, Price ,Inventory management, NOT print label, Minimum stock, Initial stock, Default supplier
If are attributes activated to products, also : Size, Color, Model, Model description
Field |
Description |
Type |
Max length |
*Required |
Code |
Product code Id |
String |
31 |
* |
Description |
Product description |
String |
50 |
* |
Notes |
Adicional product description |
String |
Unlimited |
|
Category |
Category Id |
String |
10 |
*If not, it will be created |
Subcategory |
Subcategory Id |
String |
10 |
*If not, it will be created |
Class |
Class Id |
String |
10 |
*If not, it will be created |
Brand |
Brand Id |
String |
10 |
*If not, it will be created |
Season |
Season Id |
String |
5 |
*If not, it will be created |
Barcode |
Product barcode |
String |
20 (for each codebar) |
Multiple values can be imported, separating them by # |
Cost price |
Number |
|||
Tax |
Tax Id |
String |
1 |
* |
Tax value |
Tax value (%) |
Number |
* |
|
Level price |
Level price / rate Id |
String |
5 |
* |
Price |
Price to sale |
Number |
* |
|
Inventory management |
Activate stock treatment |
String |
True/False |
|
NOT print label |
To be labeled or not |
String |
True/False |
|
Minimun stock |
Minimun stock |
Number |
||
Initial stock |
Initial stock to new products |
Number |
||
Default supplier |
Supplier associated with product |
Number |
00101,Apple Iphone 5,7.6 mm and 112 grams,11,5,APPLE,,XMAS,8430373001014,250,R,7,1,299,True,,5,50
00102,Apple Ipad,iPad with Retina display,12,10,APPLE,,,8430373001015,525,R,7,1,729,True,,10,12,1
00103,Apple Ipod,2GB iPod shuffle,13,4,APPLE,MOD1,,8430373001025,"32,25",R,7,1,49,True,,20,
If are attributes activated to products, also::
Size |
Size Id |
String |
7 |
If not, it will be created |
Color |
Color Id |
String |
7 |
If not, it will be created |
Model |
Model id |
String |
20 |
If not, it will be created like product code id |
Model description |
Model description |
String |
50 |
If not, it will be created like product description |
Color description |
Color description |
String |
20 |
|
Size description |
Size description |
String |
20 |
1046BL37;shoe Blue 37;;13;;;;;8423000000160;15;N;20;1;25.56;True;False;;;0;37;BL;1046;shoe;Blue;
1046BL38;shoe Blue 38;;13;;;;;8423000000177;15;N;20;1;25.56;True;False;;;0;38;BL;1046;shoe;Blue;Medium
1046GR37;shoe Green 37;;13;;;;;8423000000184;15;N;20;1;25.56;True;False;;;0;37;GR;1046;shoe;Green;
1046GR38,shoe Green 38,,13,,,,,8423000000191,15,N,20,1,"25,56",True,False,,,0,38,GR,1046,shoe;;
1046RE37,shoe Red 37,,13,,,,,8423000000207,15,N,20,1,"25,56",True,False,,,0,37,RE,1046,shoe;;
1046RE38,shoe Red 38,,13,,,,,8423000000214,15,N,20,1,"25,56",True,False,,,0,38,RE,1046,shoe;;
LEVEL PRICES / RATES (add and edit): Update product prices
Level price, Id product, Price
Field |
Description |
Type |
Max length |
*Required |
Level Price /rate |
Rate Id |
String |
5 |
* |
Id product |
Product code Id |
String |
31 |
* |
Price |
Sale price |
Number |
* |
1,1000,12
1,1001,8,5
USD,1000,15
USD,1001,"12,3"
RECEIVE FROM SUPPLIER: (add): Purchases from suppliers, supplier delivery note and entry movements are created in store.
ID supplier, Location, Date, Document number, ID Item, Quantity, Cost price, Tax, Tax amount
Field |
Description |
Type |
Max length |
*Required |
Id supplier |
Supplier id |
Number |
*If not, it will be created |
|
Location |
Id store where products are |
Number |
*If not, it will be created |
|
Date |
Entrace date |
String |
If not empty, must be the same format configurated in your company |
|
Document number |
Document id |
String |
15 |
* |
Id ítem / product |
Product code Id or codebar |
String |
31 |
* |
Quantity |
Quantity purchase to supplier |
Number |
*Only will do incoming goods movement if product has inventory managment |
|
Cost price |
Purchase price |
Number |
* |
|
Tax |
Tax Id |
String |
1 |
If not specified, the tax associated to the product will be used |
Tax amount |
Total tax amount |
Number |
If not specified, It shall be calculated from tax id |
|
Description |
Product description |
String |
50 |
If the product does not exist, this field is very highly advisable |
Category |
Category Id |
String |
10 |
* If the product does not exist, this field is very highly required |
Barcode |
Product barcode |
String |
20 |
Only used if the product does not exist. |
1,1,01/01/2016,REF1,1001,5,6,N,1
1,1,01/01/2016,REF1,1002,1,4,N,2
1,1,01/01/2016,REF1,1003,3,2,N,
1,1,01/01/2016,REF1,1004,6,,,
2,1,01/02/2016,A-589,8456923584125,7,,,
2,1,01/02/2016,A-589,1007,9,6,R,
2,1,01/02/2016,A-589,1010,8,3,N,1
If are attributes activated to products, also::
Model |
Model id |
String |
20 |
If not, it will be created like product code id |
Model description |
Model description |
String |
50 |
If not, it will be created like product description |
PHYSICAL COUNT (add): Create physical count to the store.
Location, Id product, Quantity
Field |
Description |
Type |
Max length |
*Required |
Location |
Id store where products are counted |
Number |
* |
|
Id product |
Product code Id or codebar |
String |
31 |
* |
Quanity |
Quantity product has been counted |
Number |
*Only will incorporated if product has inventory managment |
1,210500,10
1,210501,12
1,210502,"25,87"
CATEGORIES (add and edit): Category, Name
Field |
Description |
Type |
Max length |
*Required |
Category |
Category Id |
String |
10 |
* |
Name |
Category's name |
String |
30 |
11;Mobile
12;Tablets
SUBCATEGORIES (add and edit): Subcategory, Description
Field |
Description |
Type |
Max length |
*Required |
Subcategory |
Subcategory Id |
String |
10 |
* |
Descriptionn |
Subcategory’s name |
String |
50 |
4,four inches
5,five inches
6,TV
7,Home cinema
CLASSES (add and edit): Class, Name
Field |
Description |
Type |
Max length |
*Required |
Class |
Class Id |
String |
10 |
* |
Name |
Class name |
String |
50 |
DELL,Dell computer
LENV, Lenovo
APPLE,Apple computer
BRANDS (add and edit): Brand, Description
Field |
Description |
Type |
Max length |
*Required |
Brand |
Brand Id |
String |
10 |
* |
Description |
Brand’s name |
String |
50 |
INT,Intel
AMD, Amd computer
SONY,Sony
SEASONS (add and edit): Season, Description
Field |
Description |
Type |
Max length |
*Required |
Season |
Season Id |
String |
5 |
* |
Descriptionn |
NSeason’s name |
String |
30 |
WIN,Winter
SP,Spring
SUM,Summer
OFF,Offers
Customer, Name, Trade name, Address, Zip code, City, Tax identification, Phone, Obsolete, Tax-free, Discount, Comments, Email, Country, State, Language, Customer type, Level price, Store
Field |
Description |
Type |
Max length |
*Required |
Customer |
Customer Id |
Number |
* |
|
Name |
Customer’s name |
String |
50 |
|
Trade name |
Customer’s company’s name |
String |
50 |
|
Address |
Address |
String |
50 |
|
Zip code |
Zip code |
String |
10 |
|
City |
City |
String |
50 |
|
Tax identification |
Tax identification |
String |
25 |
|
Phone |
Phone |
String |
25 |
|
Obsolete |
Active customer or not |
String |
True/False |
|
Tax free |
Don’t pay taxes |
String |
True/False |
|
Discount |
Apply this discount in sales |
Number |
||
Comments |
Comments |
String |
Unlimited |
|
Email, needs to use eReceipt |
String |
50 |
||
Country |
Country ISO code (2 letters) |
String |
5 |
If not, it will be created. If empty uses company country code. |
State |
Customer’s state |
String |
5 |
|
Language |
Language ISO code (2 letters) |
String |
5 |
If not, it will be created. If empty uses company language code. |
Customer type |
Customer type |
String |
5 |
*If not, it will be created |
Level Price / rate |
Id level Price / Id rate |
String |
5 |
*If not, it will be created |
Store |
Store associated to customer |
Number |
You can only access this customer from the store/POS associated. If empty all stores can |
10001,Vila Romero Maria,,Rambla 345 8º 1ª,08010,Barcelona,391577883P,934556688,False,False,,,mvila@gmail.com,ES,08,ES,10,1,1
10002,Smith Charles,Techno Soft, Street 344 San Francisco,,California,HhgJ88D,3455787972,False,False,12,,chartech@gmail.com,FR,,FR,10,1,
Supplier, Name, Tax identification, Trade name, Address, Country, Zip code, City, Phone, Phone2, Fax, Email, Web, Obsolete, Comments
Field |
Description |
Type |
Max length |
*Required |
Supplier |
Supplier Id |
Number |
* |
|
Name |
Supplier’s name |
String |
50 |
|
Tax identification |
Tax identification |
String |
25 |
|
Trade name |
RSupplier’s company’s name |
String |
50 |
|
Address |
Address |
String |
50 |
|
Country |
Country ISO code (2 letters) |
String |
5 |
If not, it will be created. If empty uses company country code. |
Zip code |
Zip code |
String |
10 |
|
City |
City |
String |
50 |
|
Phone |
Phone |
String |
25 |
|
Phone 2 |
Alternative phone |
String |
25 |
|
Fax |
String |
25 |
||
String |
50 |
|||
Web |
String |
100 |
||
Obsolete |
Active supplier or not |
String |
True/False |
|
Comments |
Comments |
String |
Unlimited |
|
| Electronic documents | Allows you to send email to this provider | String | True/False | |
| Creditor | Mark this supplier as a creditor. | String | True/False |
20,"Micronet,s.a.",A28698599,,Ecuador, 3-5,ES,08029,Barcelona,93466540,,784420474,,,False,,,
21,Asicom,A0898778,"Asicom,s.l.","Arago, 254 6ª",ES,08007,Madrid,93459000,664862778,,asicom@gmail.com,http://www.asicom.es,False,Ask to David,True,False
Employee, Name, Address, Phone, Comments, Obsolete, Store, Type
Field |
Description |
Type |
Max length |
*Required |
Employee |
Employee Id |
Number |
* |
|
Name |
Name |
String |
50 |
|
Address |
Address |
String |
50 |
|
Phone |
Phone |
String |
25 |
|
Comments |
Comments |
String |
Unlimited |
|
Obsolete |
Active or not |
String |
True/False |
|
Store |
Store belongs |
Number |
This employee only can work in store associated, empty if you want to work in all. |
|
Typo |
Security level POS: |
String |
V, E or S |
If empty, default is V |
5,Susan Smith,Rue Ghirs, 4,4589745,llamar antes del mediodia,False,,E
6,Charles Manjin,Joseph Ventura, 6,937544,,,1,S
ID coupon; Description; Coupon type; Stores; Offer type; Offer; Condition to apply coupon; Customer type; Customer; No. uses per coupon; Times used; Expiration; Valid; Generate from POS; Offer type to generate from POS; Condition to generate from POS
Field |
Description |
Type |
Max length |
*Required |
ID coupon |
Coupon identifier |
String |
50 |
* |
Description |
Coupon's description |
String |
Unlimited |
|
Coupon type |
Who is the coupon addressed to: |
String |
1 |
If empty, default G. |
Stores |
Stores ID where you can use the coupon. |
String |
100 |
Id's separated by #. If empty, all stores default. |
Offer type |
Type offer offered by the coupon: |
String |
2 |
* D, I, DA o IA |
Offer |
Offer offered by the coupon |
Number |
* The value will act as a discount, a reduction in the amount or a price offered, depending on the type of offer field. |
|
Condition to apply coupon |
Condition that must be met in the sale to apply the coupon |
String |
For offers D or I, total purchase amount that must be exceeded. For DA or IA offers, the associated item. |
|
Customer type |
Id of the type of customer if the coupon type is T |
String |
5 |
|
Customer |
Customer ID if the coupon type is C |
Number |
||
No. uses per coupon |
Times that the coupon may be used |
Number |
If empty, default 1 (only once) |
|
Times used |
Times coupon has already been used |
Number |
If empty, default 0 |
|
Expiration |
Expiration date |
Date |
Format dd/MM/yyyy |
If empty, default 3 months from the date of creation. |
Valid |
ndicates whether the coupon is valid at the time of creation or not. |
String |
True/False |
If empty, default TRUE |
Generate from POS |
ndicates if the coupon will be printed after making a sale in POS |
String |
True/False |
If empty, default FALSE |
Offer type to generate from POS |
Condition type that must be met for coupon to be printed after making a sale: | String |
1 |
|
Condition to generate from POS |
If condition type is I or A, the condition value is indicated here |
String |
* If condition type I: amount that has to be overcome. |
77088967;;G;1#2#99;I;5;5;;;1;0;15/06/2018;True;True;I;10
77379443;;G;1#2#99;D;25;0;;;10;2;27/01/2018;True;True;;
77693414;20% if sale + $100;G;1#2#99;D;20;100;;;10;0;15/06/2018;True;False;;
77732052;;G;1#2#99;IA;1,7;1030;;;12;2;27/10/2018;True;True;;
77749237;Discount Item1;G;1#2;DA;20;1004;;;1;0;07/02/2018;True;False;;
Select one or more image files to update the image for the corresponding item. The image name will identify the article to be updated. Supported image formats are: jpeg, jpg, bmp, png and gif.
It's recommended that the image size does not exceed 100Kb.
The selected image will be saved as the main image of the item if you click the "Upload Image" button, as the second image if you click the "1" button, and as the third image if you click the "2" button.
Option to send, individual or massive, emails to a group of people with an associated email. For this option is necessary to be correctly configured SMTP option. You can select customers, suppliers or stores as addressee. You can attach diferent documents depending you email is addressed:
·Customers: You can attach receipts, customer orders or coupons.
·Suppliers: You can attach supplier orders.
·Stores: You can attach store orders.
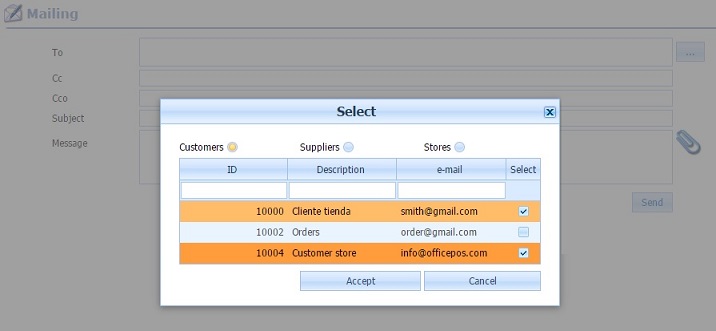
To attach files, you have to click on  after when you have selected people to send.
13. Help
Access to this tutorial.
Filling a simple form you can contact with our team to resolve any questions you have. The answer will be sent to the email you provided us.
c) Remote support (only Premium users with support Plus)
OfficePos gives you the posibility to connect directly to your computer, to help with the installation or any problems you have with OfficePos. Just download a small program and run it. The program will give you an ID and password that will have to send us through the form remote support (NOT close the screen with your ID and password, we need open for connection). Our technician can connect and resolve any problem or doubt. Download program to connect with you
d) d) Download POS tutorial (winPOS)
Access to POS tutorial, also available from option Help in POS. Download tutorial OfficePos Point Of Sale
e) Download OfficePos Mobile Add to my device
Application for mobile devices and tablets allows you to control and manage in real time its chain of
stores or branches.
OfficePos Mobile is an ideal tool for your organization manager for allowing you to see at all times the daily
activity of your stores, analytical information in prior periods and many more features.
OfficePos Mobile it's Made with the latest technology, so it's not necessary any installation on your device, does not need space
or require updates. OfficePos Mobile will always be update and future features will always be available without the need for any user action.
Installation is very simple, you just have to enter my.officepos.com/MobileApp.aspx in the browser of your device or scan the QR code shown below * and nothing else. If you use Android, the system will automatically ask if you want to add OfficePos Mobile to your environment. If you use iOS, you must use the option in the bottom bar " Add to home screen ". In both cases, the OfficePos Mobile icon will be added to your system.
 *Scan this code from your device to install OfficePos Mobile
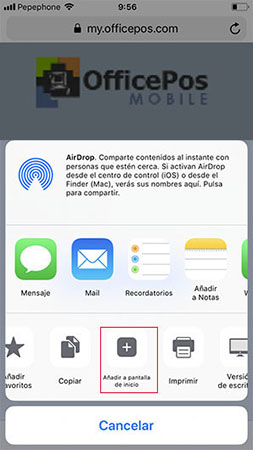
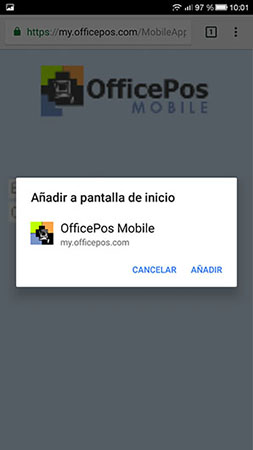
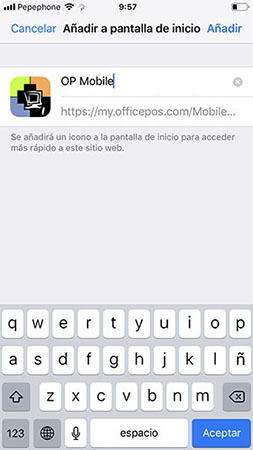
| OfficePos Mobile has several utilities: | · Dashboard: Sales per store, category, product. Overall volume of business, profits, taxes. Sales History for months. View last transaction of its store network, by date: today, yesterday, week, month, year, previous dates,... |
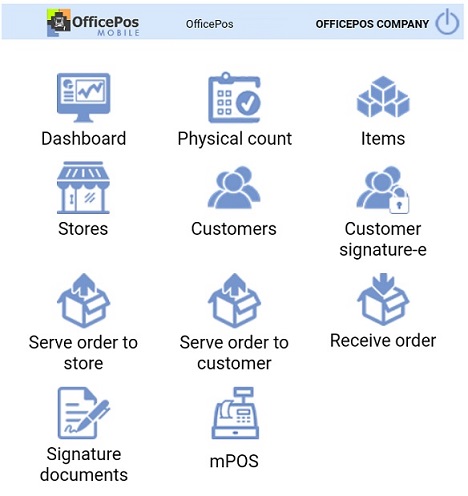 |
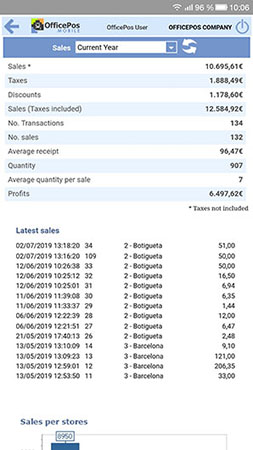
|
| · Physical count: Physical count list. It allows to manage (create, edit or delete) physical counts. To edit click on the line, to change the units of a product you just have to click on the product line. Physical count update can only be done from web, or from the POS. | · Items: Items list and online data about stock and sales of other stores. |
|
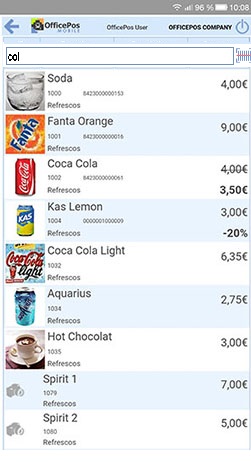 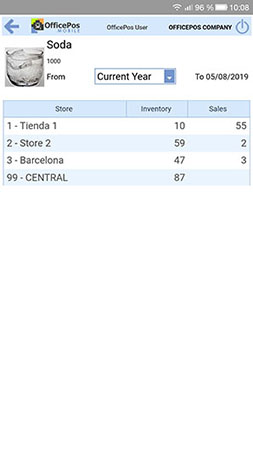 |
| · Stores: Store list and data of their most significant KPI. | · Customers: Customers list and their sales. Also you can see the receipt. |
 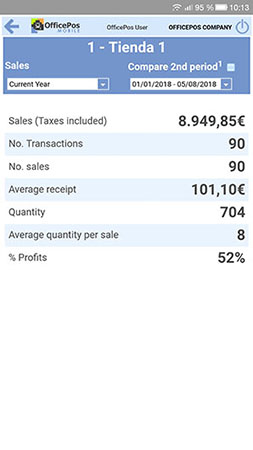
|
 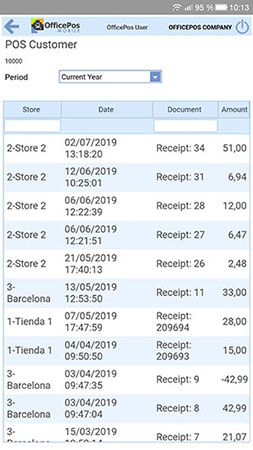
|
| · Customers signature-e: Manage data protection and send advertising to customers. When data protection has been authorized by the customer, the signed document can be sent to him. | |
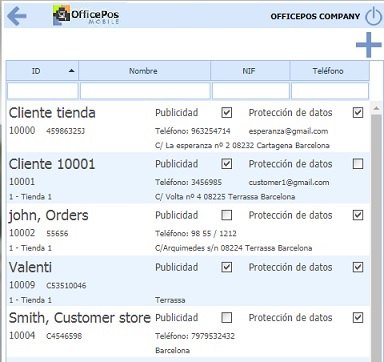
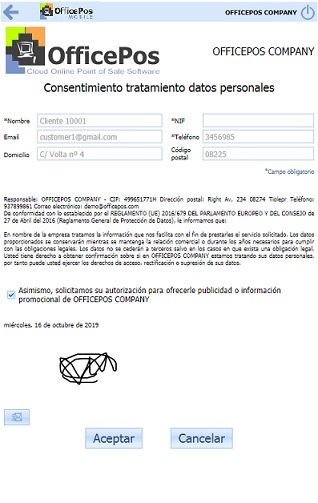 |
|
| · Serve store order: Serve replacement orders to stores. Make the transfer of merchandise from a selected warehouse to the store. | |

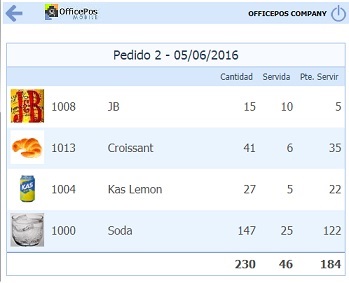
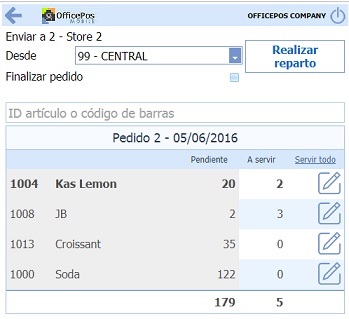
|
|
| · Server customer order: Serve customer orders. Serve the customers order creating a customer delivery note or invoice. | |
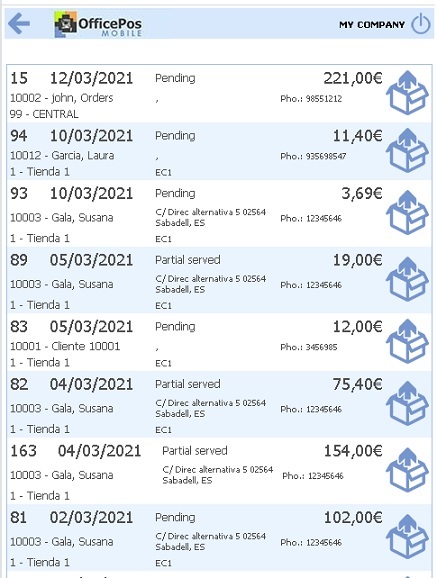
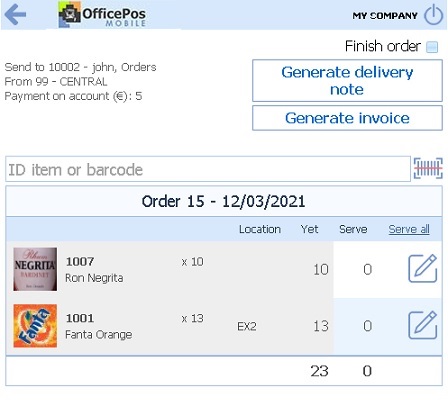
|
|
| · Receive order: Receive the merchandise that a supplier sends from an order that has been placed. | |
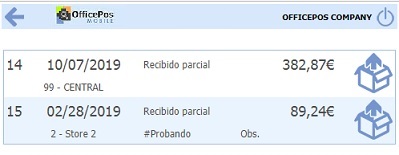
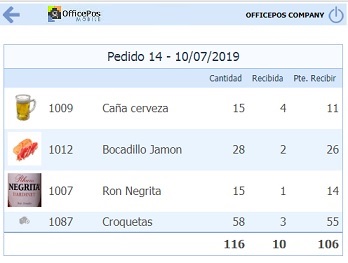
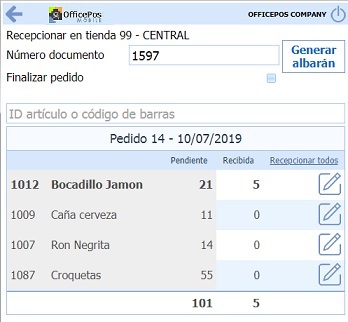 |
|
| · Signature documents: Documents to sign for clients. | |
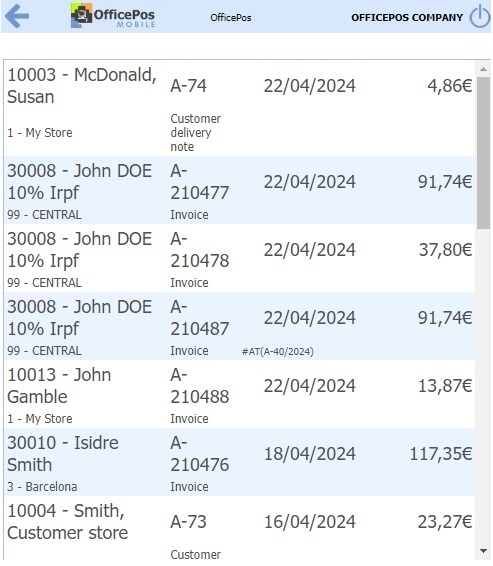
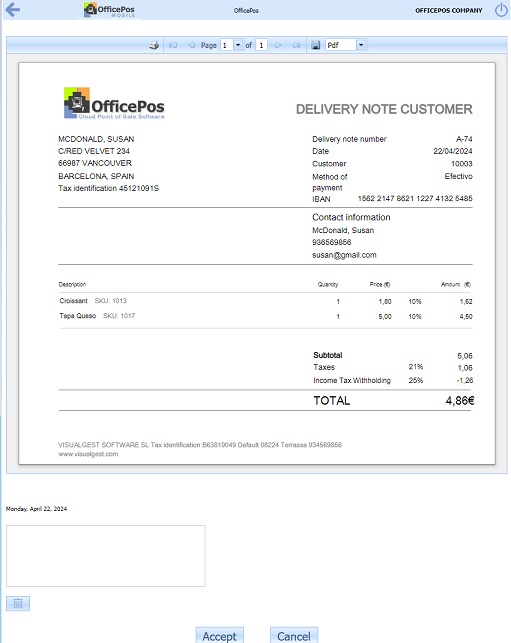 |
|
| · mPOS: Point of sale that can be used from any device that has a browser and internet connection. | |
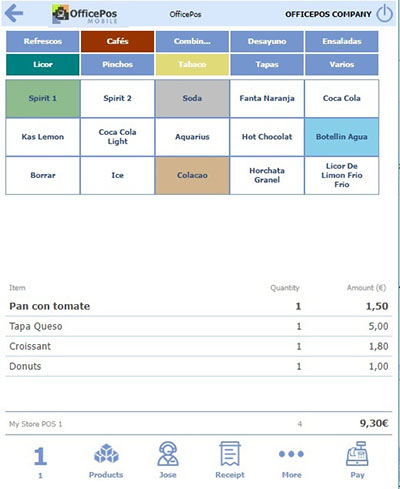
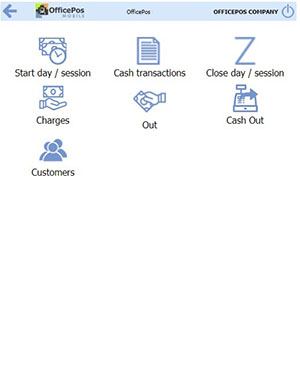
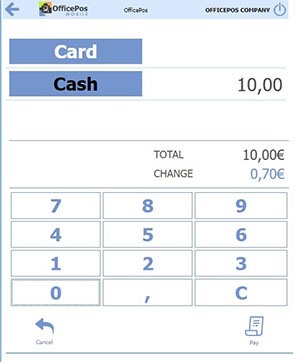
|
|
|
·
WorkTime: Employees will be able to manage their time clocks through this option, and also report absences.
It is recommended that each employee has their own password, because when accessing the time record, the first option is to identify themselves as an employee.
Once identified, different time clock options will appear: in, out or pause. These options will create entries/exits with the current date and time.
If you want to make a time clock for another day, it must be done from the website by an administrator user. Employees can report their absences by clicking on the "Report absence" button. They will only have to select a date and explain the reason for the absence. They can also view their worktime (if you have permission) by clicking on the "My timetable" button. |
|
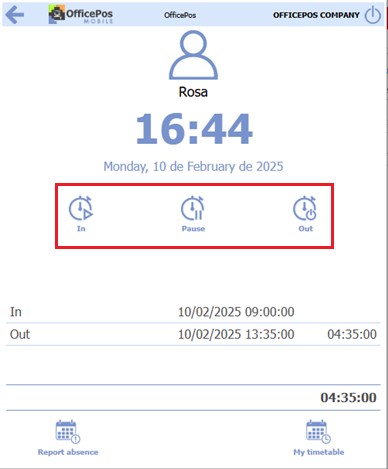
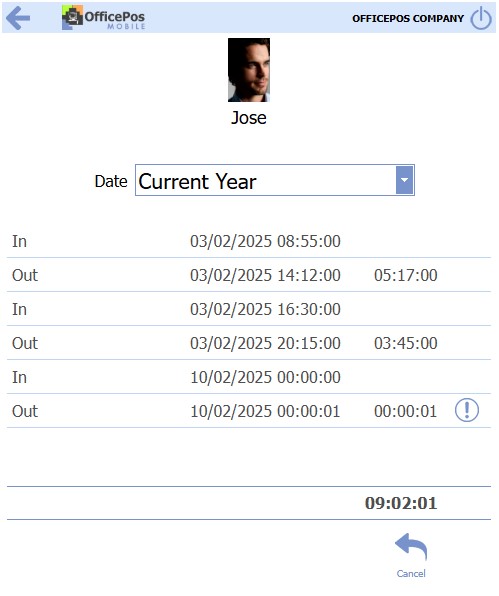
|
|
